Parallel processing is a powerful technique used in audio mixing that involves creating a duplicate (or “copy”) of a signal, applying intense or specific processing to that copy, and then blending it back with the original (dry) signal. The essential aim is to enhance or modify the sound—often to add punch, depth, warmth, or clarity—without obliterating the natural dynamics of the original audio. In essence, you maintain the integrity and definition of the dry track while layering an extreme or customized effect in parallel.
In professional mixes, parallel processing is frequently used on drums, vocals, bass, guitars, and even on the mix bus itself. Three of the most popular parallel processing applications include parallel compression, parallel saturation (or distortion), and parallel reverb. While many engineers often use sends for reverb by default (which is effectively parallel), there’s a world of advanced techniques that go beyond a simple one-plugin reverb. In this masterclass, we’ll delve into these three cornerstones: parallel compression (often called “New York” compression), parallel saturation/distortion, and parallel reverb/FX chains. We’ll explore why parallel processing is so effective, lay out precise parameter settings, and discuss how to fine-tune each technique in a generic DAW environment—using Logic Pro as a reference but staying relevant across all platforms.
By the end of this guide, you’ll be able to craft huge drum sounds, add warmth and presence to vocals or bass without losing clarity, and create rich, layered reverbs that enhance depth while preserving definition. You’ll also learn how to manage critical details like gain staging, level matching, and phase coherence to ensure that your parallel setups don’t introduce unwanted artifacts. Let’s start our deep dive into parallel processing, beginning with one of the most famous and time-tested approaches: parallel compression.
Table of Contents
- Parallel Compression (“New York” Compression)
- Parallel Saturation/Distortion
- Parallel EQ
- Parallel Reverb and Advanced FX
- Technical Tips and Best Practices
- Conclusion
Parallel Compression (“New York” Compression)
Parallel compression, also known as “New York” compression, involves taking an instrument track—commonly drums—sending it to an auxiliary channel where you apply heavy or aggressive compression, and then blending that squashed signal underneath the original. The advantage is that you get the best of both worlds: the uncompressed (or only lightly compressed) track retains transients, while the processed parallel track adds body, punch, and sustain.
Setting Up Parallel Compression
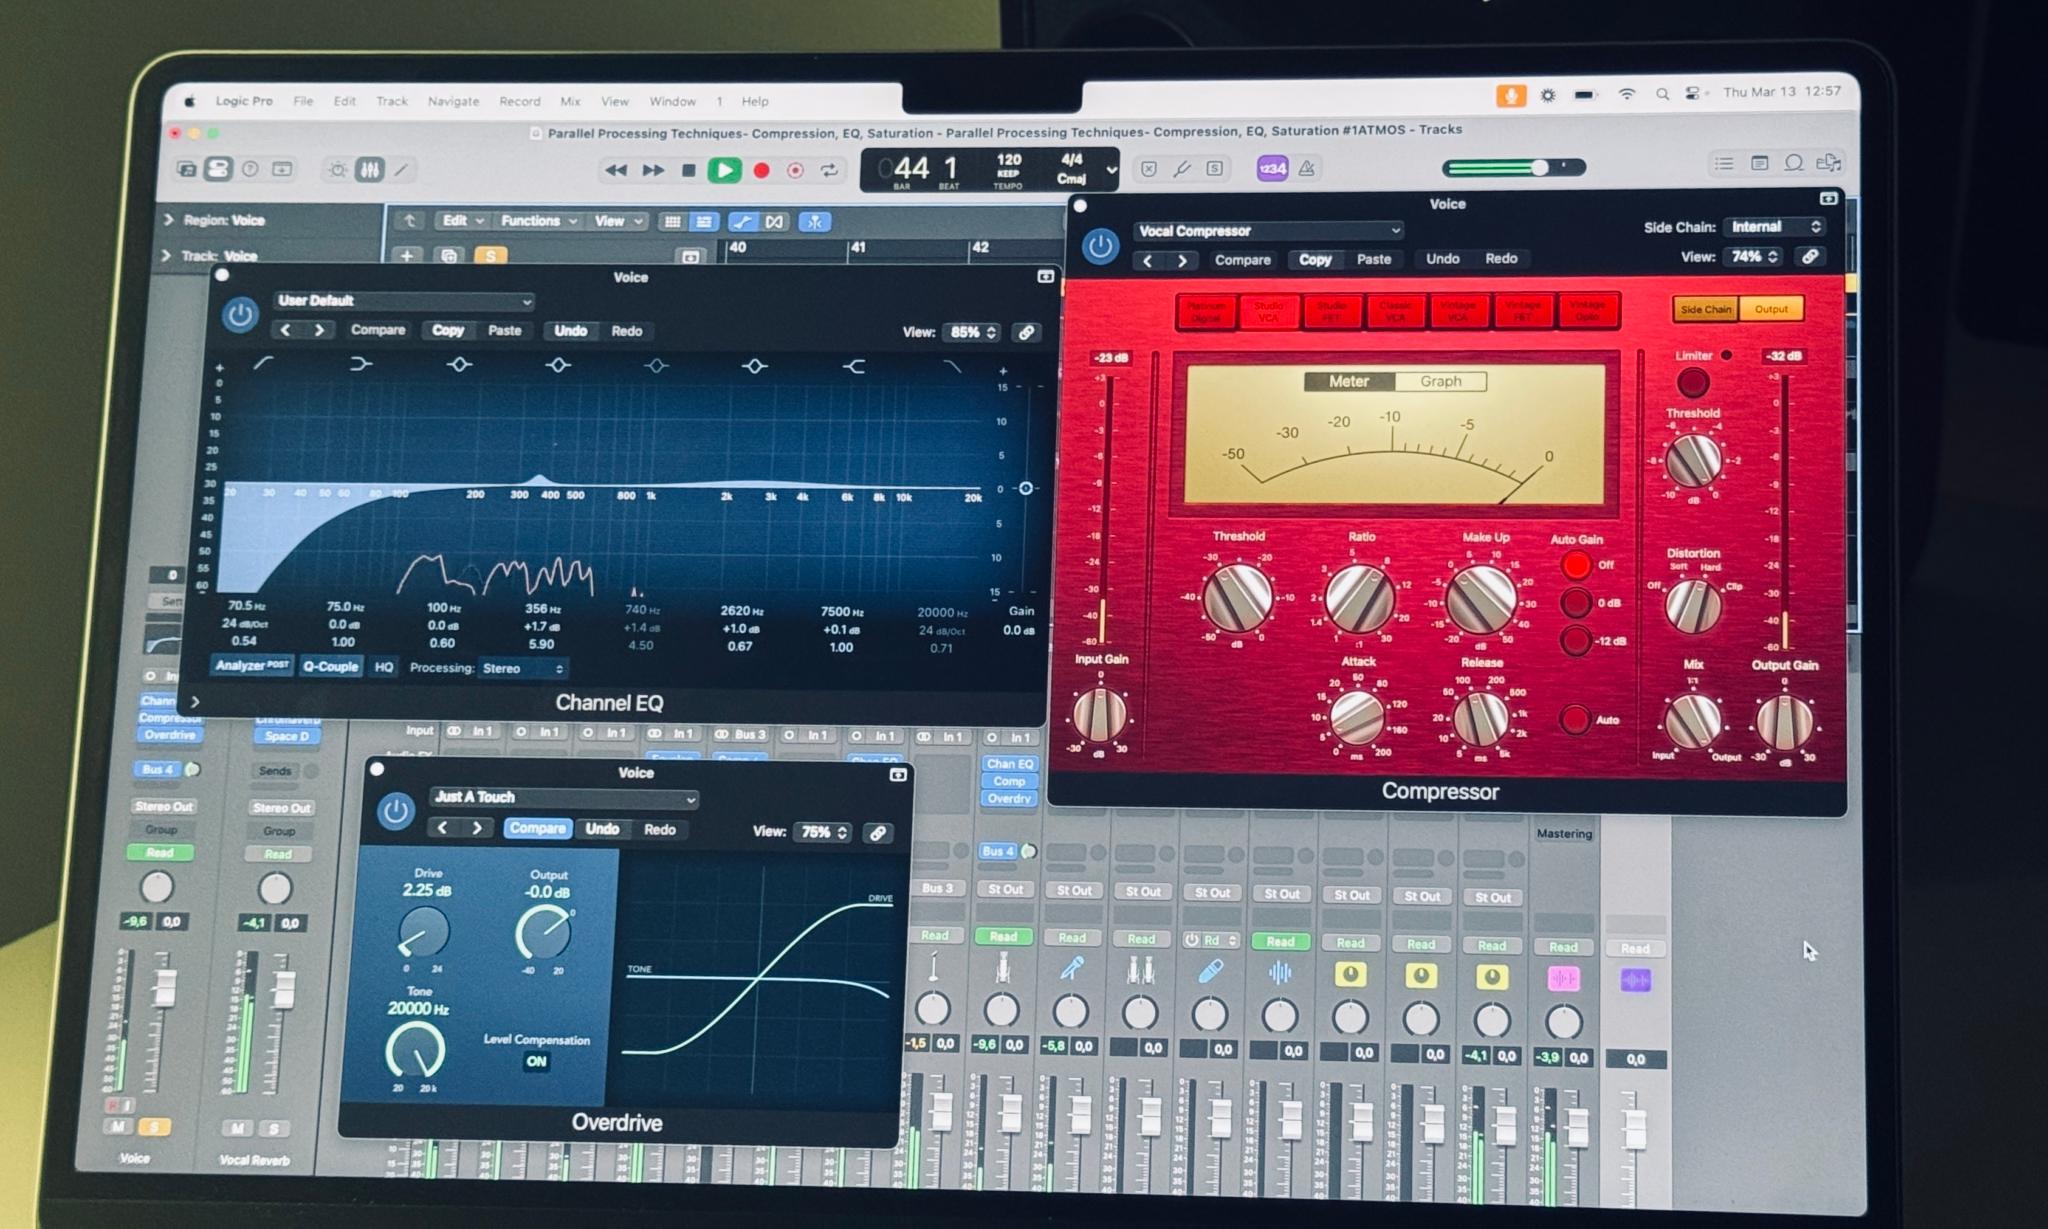
When you set up parallel compression on drums, you typically use a post-fader send from the drum bus (or individual drum tracks) to a new aux channel. In Logic Pro, you might create a send on your drum bus to Bus 1, which generates a fresh auxiliary strip. You label that “Drum Parallel Comp.” On this aux, you insert a compressor plugin set to 100% wet.

A common approach is to use very high ratios—sometimes up to 8:1 or 10:1—and then push the threshold so that the compressor applies significant gain reduction, around 10 to 15 dB on peaks. A medium attack (often around 20–30 ms) ensures that some snap of the drum transient still pokes through, while a fast or medium-fast release (such as 50–150 ms) lets the compressor recover quickly, adding that characteristic pump or thickness. The result, when heard in isolation, can sound overly smashed. But in a parallel context, you blend that channel in softly, so you’re only hearing a layered amount of the slammed sound.
Attack, Release, and EQ Tricks
A medium attack around 20–30 ms is a good starting point because it allows the initial kick or snare transient to escape full compression. This preserves some of the dynamic bite in the parallel channel. If you want an even more extreme effect, you could use a faster attack, effectively crushing the initial spike of each drum hit, which yields a thick, sustained tone. The release time is often set fast (50–150 ms) so that the compressor resets quickly between hits, creating a pumping, energetic effect. If you hear undesirable distortion, you can slow the release slightly.
Another popular aspect of parallel compression on drums is EQing the compressed channel. Some engineers apply a “smiley-face” EQ to the heavily compressed bus, boosting the low frequencies around 60–100 Hz for weight, and the high frequencies around 8–10 kHz for sparkle. They may also scoop the mids to avoid a boxy or muddy texture. Because this EQ is only on the parallel track, and the dry track remains untouched, you can be far more aggressive with the tone shaping. This trick is one reason the “New York” compression technique is so admired—it allows you to accentuate extremes without sacrificing the natural balance of the main drum mix.
Balancing the Dry and Wet Signals
With parallel compression, how you blend the wet channel is critical. The usual advice is to start with the parallel fader down, then slowly raise it until the drums feel bigger and thicker, but not obviously crushed. Ideally, you want to notice the energy and density the parallel path brings, rather than hear an over-compressed effect. A good litmus test is to mute the parallel aux and see if the drums suddenly feel weak or lifeless. If that happens, it’s working. If you find the difference negligible, you might bring the wet channel up a bit more or increase the compressor’s gain reduction.
It’s crucial to level-match. Sometimes you’ll be adding considerable volume with the parallel channel, so you have to be mindful not to trick yourself into thinking “louder is better.” Check your overall bus level and ensure it’s not distorting. If needed, pull the main drum bus fader down slightly to preserve headroom. Once you find the sweet spot, the drums will typically sound more commanding, with reinforced sustain on kicks and snares, while still allowing the original transients to shine through.
Parallel Saturation/Distortion
Where parallel compression focuses on dynamics, parallel saturation (or distortion) is about harmonic enhancement. By duplicating a track and distorting that copy, you can add grit, warmth, and presence without making the main signal sound overtly overdriven. This is particularly effective on vocals, bass, or even synths when you want more richness in the midrange or a subtle analog-esque glow.
Setting Up Parallel Saturation
In a DAW like Logic Pro, you might send your vocal track to an aux labeled “Vox Saturation.” Insert a saturation or distortion plugin on this aux—anything from a tube or tape saturator to a heavy fuzz unit, depending on your goal. Keep the plugin’s mix control at 100% wet, and feed it enough input to get a clearly audible overdrive or warmth when soloed. Often, you can push this quite hard because you’ll eventually blend it in quietly.

If you’re worried about the plugin’s latency or phase shifts, confirm your DAW is compensating automatically. Logic Pro typically handles this. If you suspect phasing, consider flipping the polarity on the aux or using a linear-phase EQ to reduce any time-based artifacts introduced by your processing chain.
Drive Amount, Tone, and Frequency Focus
A key part of parallel saturation is deciding how intensely you want to drive the plugin. For a subtle harmonic boost—common in styles like singer-songwriter or acoustic-based mixes—you might set the drive to a lower setting, enough to warm the signal but not make it obviously crunchy. For rock or metal, you might push the saturator to the point of clear distortion, especially on the midrange of guitars or bass.
You can also EQ before or after the saturation to target particular ranges. For example, you might high-pass the wet signal at around 200 Hz and low-pass around 8 kHz so that you’re only saturating the core vocal frequencies. This is handy for avoiding excessive hiss or rumble. Another tactic is to boost a certain frequency band into the saturator if you want to create distinct harmonic coloration. On a vocal, boosting around 2–4 kHz pre-saturation can yield more bite or presence. On bass, focusing on 800 Hz to 2 kHz can add growl and make the instrument cut through small speakers.
Blending Distortion and Preserving Clarity
Once you have the saturation sounding extreme on the aux, you bring the channel up slowly in the mix. The usual intent is to retain clarity in the dry signal while letting the saturation thicken or enhance it. Check that sibilance isn’t exaggerated to the point of harshness (if it is, de-ess the parallel channel or carefully attenuate that range). Also, watch out for phase issues in the low frequencies, especially with bass. If parallel saturation is causing the low end to disappear or thin out, flipping the phase or adjusting your EQ filters can often solve the problem.
An advanced approach is parallel distortion on just the mid/high range of a bass, leaving the fundamentals clean in the main track. You could band-pass the aux so only frequencies above 200 Hz or 300 Hz are sent into a fuzz or overdrive, then blend that in, preserving a solid sub-bass foundation in the original track. This yields a more audible bass line that still has big low end.
Parallel EQ
While most EQ applications occur as inserts on a track or bus, parallel EQ can be a powerful way to add definition, body, or sparkle without overwriting the original tonal balance. The idea is similar to other parallel processes: send your track to an auxiliary channel, apply aggressive or targeted EQ moves there, and then blend that EQ’d version back with the dry signal.
Why Use Parallel EQ?
With a standard insert EQ, heavy boosts can sometimes overshadow critical midrange information or exaggerate problem frequencies. In parallel, however, you can make bold EQ moves—like boosting lows, highs, or specific midrange areas—on the aux without losing the overall coherence of the dry track. The wet channel simply adds a colored layer on top, allowing for a more extreme tone shaping approach.
Setting It Up
- Create a post-fader send from your source track (drums, vocals, guitar, etc.) to a new aux channel.
- Insert an EQ plugin on the aux and set it to 100% wet (i.e., no dry signal in the plugin’s mix).
- Boost or cut frequencies as desired—often more aggressively than you would if it were an insert.
- Slowly raise the aux channel’s level in the mix until you notice the added emphasis or tonal enhancement.
You can also combine parallel EQ with parallel compression or saturation on the same aux if you want both dynamic and tonal shaping in a single blended channel.

Tips and Tricks for Parallel EQ
- Narrow Band Boosts: Highlight a vocalist’s presence region (e.g., around 2–5 kHz) by boosting on the aux. This can help a vocal cut through without turning harsh if you keep the overall send level low.
- Low-End Reinforcement: Boost 60–100 Hz on the parallel channel for kick drums or bass. This can add weight without risking a muddy overall sound—if it becomes too thick, simply reduce the aux fader.
- Air and Sparkle: Add a broad shelf from 8 kHz and up to introduce “air” on vocals, cymbals, or acoustic guitars. Parallel approach prevents the entire track from sounding overly bright, while still injecting a noticeable sheen.
- High-Pass or Low-Pass: If you only want to affect certain ranges, consider applying a high-pass or low-pass filter so you’re parallel-EQing only the low or high frequencies.
- Phase Considerations: As with any parallel setup, watch out for phase anomalies. A linear-phase EQ can help avoid phase shift between the dry and wet paths, though modern DAWs usually handle compensation well for minimal latency.
When done carefully, parallel EQ can open up new creative avenues for tone shaping that might otherwise be too heavy-handed as an insert. Whether you’re aiming for extra clarity, low-end punch, or shimmering highs, this method allows you to apply dramatic EQ curves in a controlled, blendable manner.
Parallel Reverb and Advanced FX
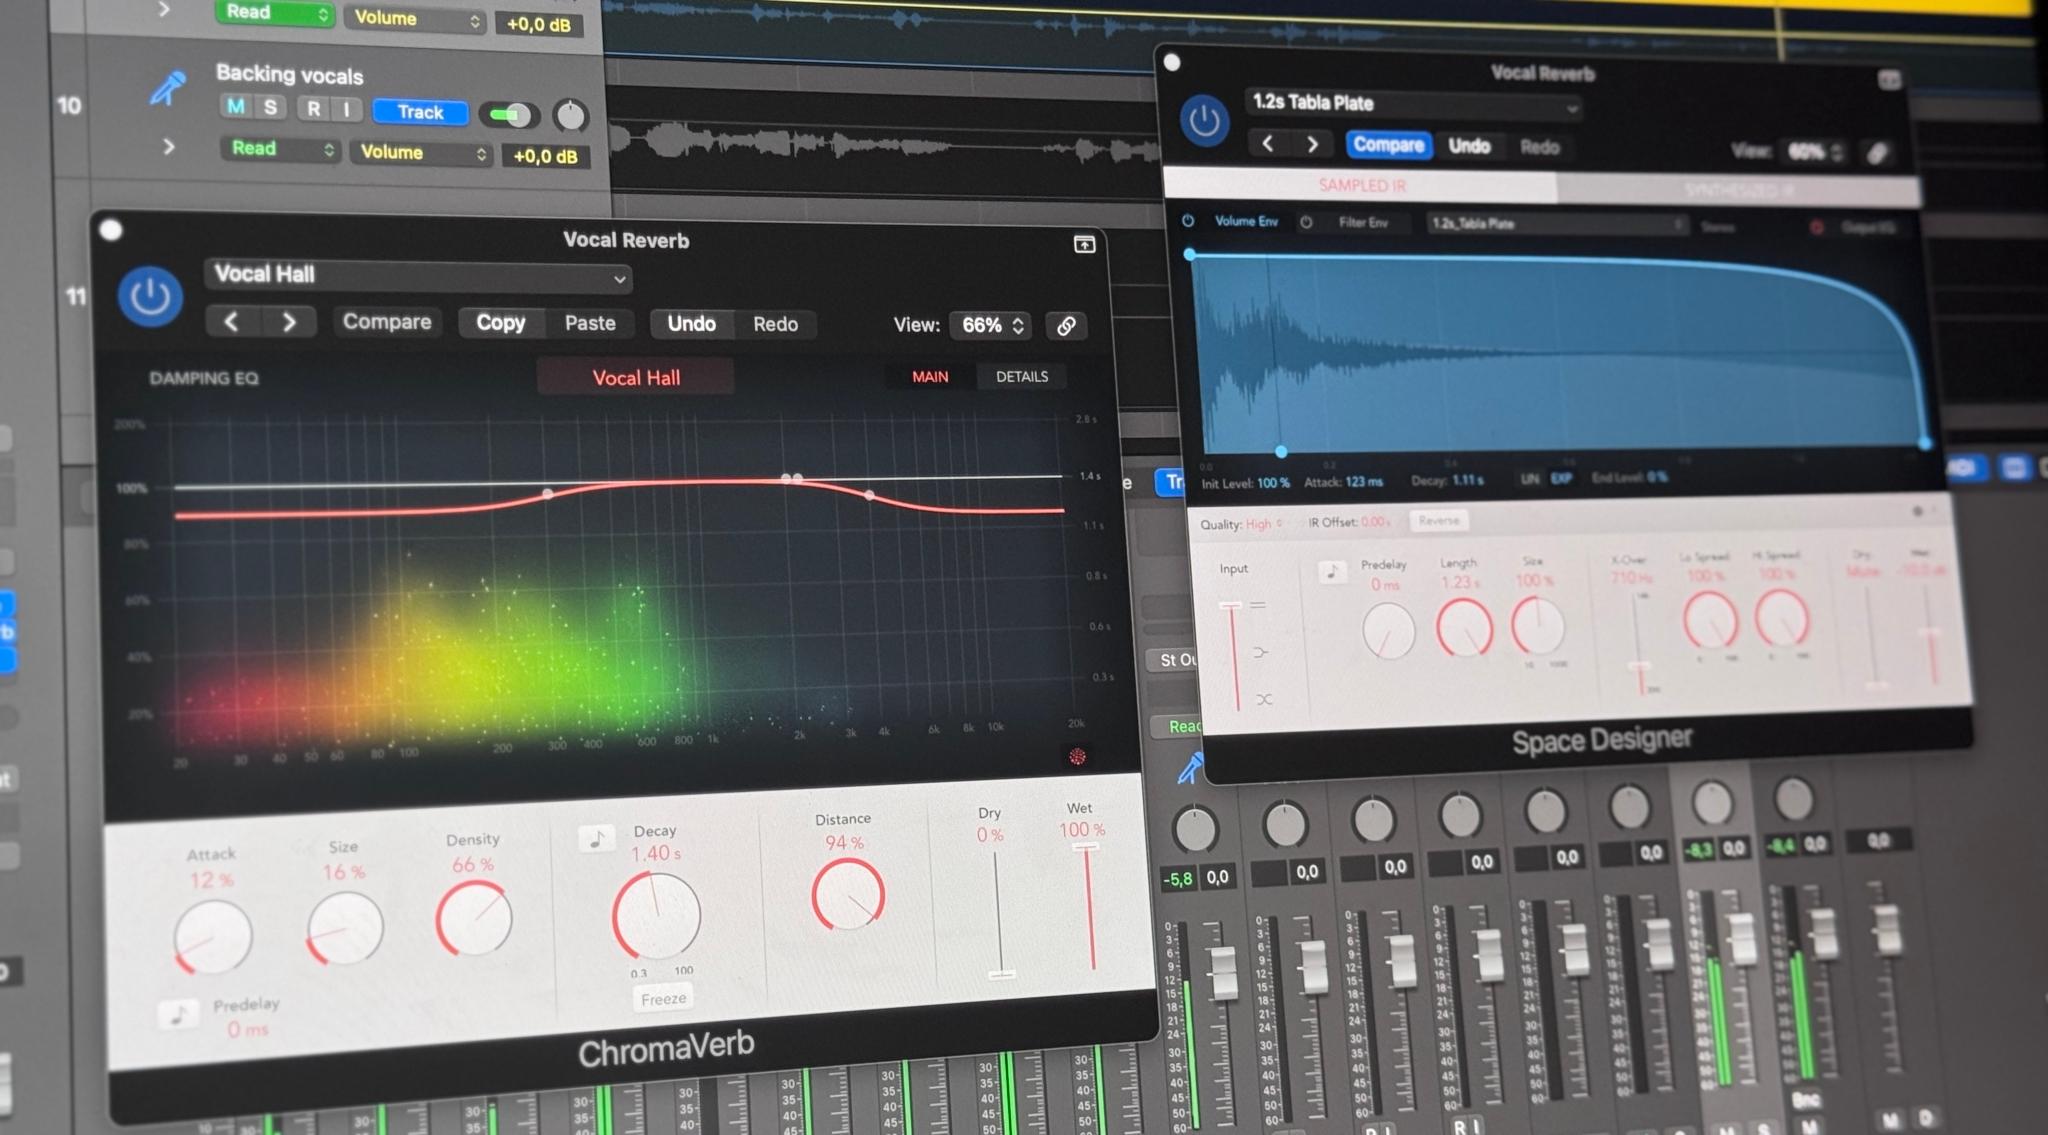
While reverb sends are typically already a form of parallel processing, many mixers don’t explore the creative layering and advanced dynamics you can apply to reverbs or other effects. The basics: you send your track to an aux with a reverb plugin at 100% wet. You dial in the reverb’s decay time, pre-delay, damping, and then blend that return. But advanced techniques can involve multiple reverbs, parallel compression on reverb tails, and even applying transient designers or exciters to an effect return.
Multiple Reverbs for Rich Textures
One of the most effective ways to create a lush soundstage is to run your source through two or more reverbs in parallel. For instance, you might send a guitar to a short room reverb and a long shimmer reverb on separate aux channels. The short room reverb provides early reflections and a sense of immediacy, while the long shimmer adds an ethereal, sustained tail.
When you blend them, you can achieve a complex depth that one reverb alone might not easily replicate. The short reverb maintains clarity and presence, so the guitar doesn’t get washed out, and the long shimmer extends the sustain, adding a dreamy quality. Similarly, vocalists might use both a plate reverb (for a more classic, dense tail) and a hall reverb (for a bigger, more spacious ambience). By controlling each reverb’s return level and EQ individually, you can create a layered acoustic space with great flexibility.
Parallel Compression on Reverb Tails
Compressing a reverb tail can shape how it blooms. If you insert a compressor after the reverb on the aux, the loudest portion of the reverb (right when the sound first hits the plugin) will get attenuated, letting you boost the overall makeup gain. This can create a longer perceived tail. For example, on a snare drum reverb, you can emphasize the decay by pushing its level but taming the initial transient of the reverb wash.
Another technique is sidechain compression of the reverb, using the dry vocal or instrument as the sidechain source. Every time the dry signal is present, the compressor ducks the reverb. When the signal stops, the reverb swells up. This keeps the mix from getting washed out while the artist is playing or singing, and still gives a dramatic tail that fills the gaps. Adjust the ratio, threshold, and especially the release time to control the speed and smoothness of that reverb bloom.
Parallel FX Chains (Exciters, Transient Designers, etc.)
Beyond reverb, you can place exciters, transient designers, or even more unconventional effects (like a bitcrusher) on a parallel aux. For drums, a transient shaper in parallel can drastically boost the attack portion of kicks and snares without ruining the overall balance. By focusing the transient designer on adding, say, +6 dB of attack, you can then blend that into the main drum bus for a sharp, punchy detail that cuts through a busy mix.
Alternatively, you might boost the sustain in parallel to simulate a roomy, ringing quality. Used subtly, it can fill out the space around drum hits. Similarly, a high-frequency exciter on a parallel channel can add sparkle and air to vocals, drums, or an entire mix. By restricting the exciter to frequencies above 6 kHz or 8 kHz, you avoid overshadowing the midrange and simply add a glimmer of brightness.
Technical Tips and Best Practices
Technical considerations underpin every parallel approach: from gain staging to phase alignment to deciding on pre-fader vs. post-fader sends. Paying attention to these details ensures that your parallel chain enhances the mix rather than causes unexpected problems.
Gain Staging and Level Matching
Because you’re summing multiple versions of the same source, it’s easy to accidentally add too much volume. Always watch your aux channel levels. A helpful technique is to bypass the parallel channel and compare the overall loudness with it enabled. You should aim to make the track or bus sound better, not just louder.
If you find that your parallel effect is significantly raising the overall level, you can pull down your main channel or bus accordingly. Keep an eye on the master or submix meters. The idea is to maintain healthy headroom while still gaining the sonic benefits of the parallel chain.
Phase and Polarity
Phase issues can arise if a plugin introduces delay or if the parallel channel inadvertently flips polarity. Modern DAWs typically handle delay compensation. Still, if you notice the low end sounding thin when the parallel channel is engaged, try flipping the polarity on the aux or on the plugin (if it offers that option). Listen carefully to the kick drum and bass region, as those frequencies are the most vulnerable to phase cancellation.

A more subtle phase concern is phase shift from non-linear EQs or from saturation plugins. To minimize problems, some engineers opt for linear-phase EQs on parallel channels, which avoid introducing additional phase shift. Although linear-phase processing can add latency, your DAW should automatically align these signals.
Pre-Fader vs. Post-Fader Sends
In most mixing scenarios, post-fader sends are the default. This ensures that when you adjust the volume of the source track, the wet/dry relationship remains consistent. If you lower the drum bus fader, you also lower the amount being fed into the parallel aux.
However, there might be times when you want to keep the parallel chain independent. Using a pre-fader send means changes to the main channel fader do not affect the send level. This can be useful for creative effects—such as letting the reverb or delay continue even when you mute or pull down the dry track in the mix. But for standard parallel compression or saturation, post-fader sends help maintain a more predictable balance.
Multi-Band Parallel Processing
A more advanced (but highly effective) variation of parallel processing is to split your signal by frequency bands—for instance, using an EQ or crossover approach to isolate the lows on one channel and the mids/highs on another. Then, you can apply different compression settings or saturation intensities to each band.
For example, on a bass guitar, you might heavily compress the low band to keep it stable and consistent, while applying a gritty overdrive to the midrange band and leaving the top end mostly untouched. When these bands are recombined, the bass can maintain a solid sub presence while offering enhanced harmonic content in the mids. This approach requires careful phase alignment and potential linear-phase filtering, but can produce highly controlled, polished results that are difficult to replicate with a single full-range parallel chain.
Managing Clutter and Clarity
Parallel processing can easily fill up your mix with excess energy. If you find your mix getting muddy or crowded, especially in the low-mids, try filtering the parallel channel. For instance, if parallel compression is making the kick drum too boomy, you can insert a high-pass filter set to 80 or 100 Hz on the wet signal. Similarly, if parallel saturation is introducing too much fizz in the top end, a low-pass filter around 10 kHz might tame it.
You can also automate the levels of your parallel channels. For example, pushing up the parallel compression on drums in the chorus and pulling it back in the verse can create dynamic contrast. Reverbs and other spatial effects can also be automated: perhaps you want a massive reverb swell at the end of a phrase, but a tighter sound during dense, rhythmic sections.

Conclusion
Parallel processing is both an art and a science. By working with duplicated or aux-sent signals in tandem with the original audio, you can achieve punch, warmth, air, and depth that would be nearly impossible through insert-based processing alone. Parallel compression ensures you can smash the dynamic range of a copy to bring out sustain and body, yet keep the natural transients and clarity of the dry track. In addition, Parallel saturation adds harmonic excitement, giving vocals, bass, or guitars the extra energy needed to cut through a mix without sounding obviously distorted.
Parallel EQ allows you to push or sculpt certain frequency bands beyond what might be acceptable in series, blending only the amount you need for color. Finally, parallel reverb (and other FX) can create expansive, lush spaces, with advanced techniques like multiple reverb layering, sidechain ducking, or parallel compression on tails leading to highly polished and immersive environments.
The secret to mastering these approaches lies in fine-tuning. Always maintain proper gain staging, listen for phase anomalies, and A/B test with the parallel channels muted and unmuted. The best way to develop an intuitive sense of how much parallel effect is “just right” is to experiment on a variety of sound sources. Drums, in particular, respond famously to parallel compression, but you might be surprised how well a parallel chain can lift the energy of a piano, bring a choral pad to life with saturation, or add fine detail to an acoustic guitar’s reverb.
About the Author

Dídac
CEO & Founder of MasteringBOXDídac is a professional audio engineer, music producer and software engineer. He is the founder of MasteringBOX and the author of many of the articles on the blog.
Leave a comment
Log in to comment