Audio signals are the backbone of music production and audio engineering. But what exactly are they? In simple terms, an audio signal is a representation of sound – either as an electrical voltage (analog) or as digital data (a stream of numbers). When you record a vocal or play back a song on your phone, audio signals are at work behind the scenes. They allow us to capture the sound of instruments and voices, manipulate those sounds, and then reproduce them through speakers or headphones.
In music production, understanding audio signals is crucial. If you’re a beginner setting up a home studio or an aspiring audio engineer, you’ve probably heard terms like analog, digital, signal flow, sample rate, and bit depth. Don’t worry if these terms sound technical – we’ll break them down. By the end of this article, you’ll know how a microphone turning your voice into electricity eventually leads to a polished track blasting through speakers. We’ll start with the basics of, move into the world of digital audio, take a deeper technical dive, and finally discuss practical applications in recording, mixing, and mastering.
So, let’s dive in and demystify how audio signals work in both analog and digital realms, and why this matters for making great music!
Analog Audio Signals
Sound travels in waves through the air – imagine the ripples when you drop a pebble in water. These waves are variations in air pressure. Analog audio deals with converting those continuous sound waves into an electrical form without breaking them into pieces.
How Sound Waves are Converted into Electrical Signals
A device called a transducer performs this conversion. The most common example of a transducer is a microphone. When you sing or play an instrument into a microphone, the diaphragm (a thin membrane) inside the mic vibrates with the air pressure changes of the sound wave. This vibration is transformed into a tiny electrical current that analogously (hence “analog”) represents the original sound wave.
For example, in a dynamic microphone, sound waves move a coil of wire attached to the diaphragm within a magnetic field, generating a corresponding electrical signal. In a condenser microphone, sound waves cause variations in a capacitor’s distance, creating an electrical voltage change. In each case, the continuous movement of the sound wave is mirrored as a continuous electrical waveform. This analog electrical signal can then travel through cables and gear, carrying the imprint of your performance.

Characteristics of Analog Waveforms (Amplitude, Frequency, Phase)
Once we have an electrical signal representing sound, it can be visualized as a waveform (a wavy line when plotted over time). Three key characteristics describe this analog waveform:
- Amplitude: This is the height or strength of the waveform at any point in time. In practical terms, amplitude corresponds to loudness or volume. A larger amplitude means a stronger electrical signal and a louder sound, while a smaller amplitude is a quieter sound. If you strum a guitar softly vs. hard, the analog signal’s amplitude changes accordingly (soft strum = small amplitude, hard strum = big amplitude).
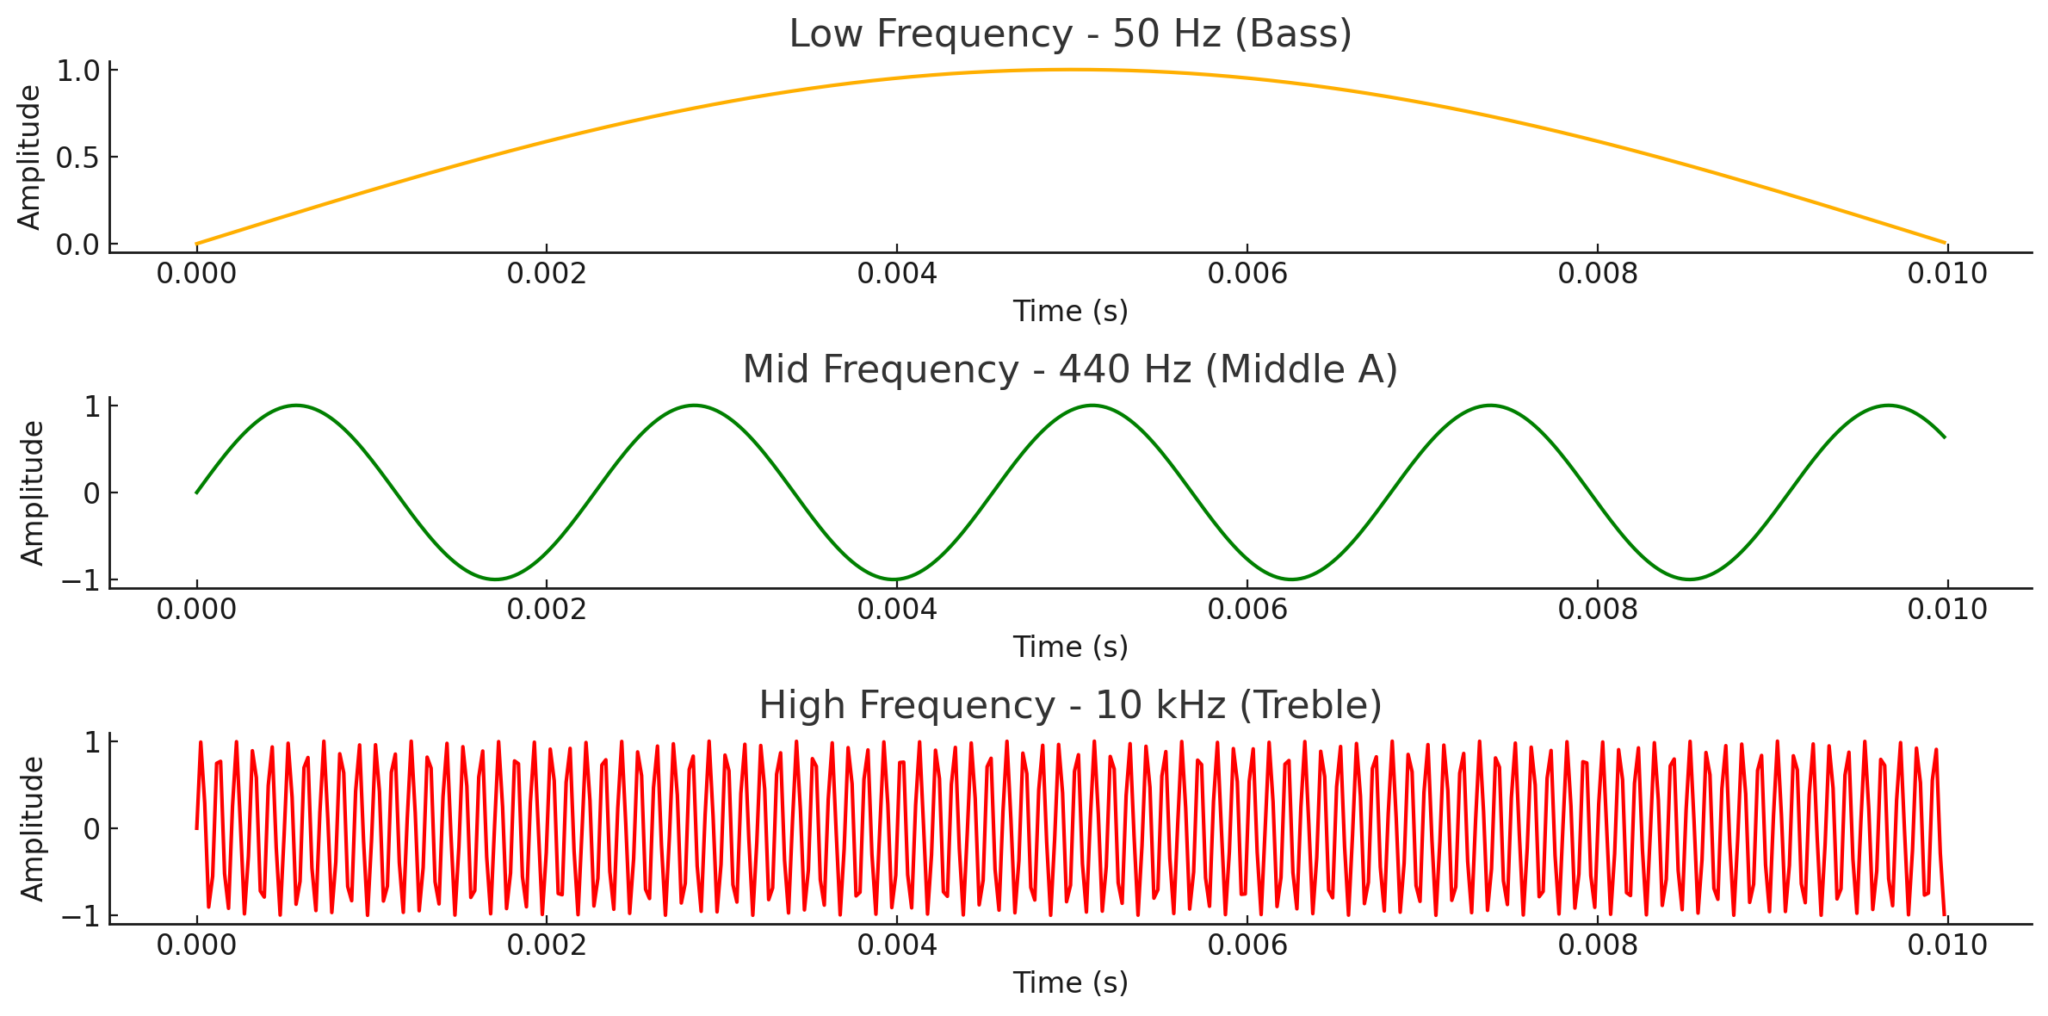
- Frequency: This refers to how fast the waveform oscillates or repeats per second. Frequency is measured in Hertz (Hz) and it corresponds to pitch. For example, a 440 Hz tone is the musical note A above middle C (it means the waveform repeats 440 times a second). Low frequencies (like 50 Hz) are bassy rumbling sounds, and high frequencies (like 10,000 Hz or 10 kHz) are treble, like a cymbal’s shimmer. Human hearing roughly ranges from 20 Hz (very low) to 20,000 Hz (very high). An analog signal can contain a mix of many frequencies at once – that’s what gives sounds their unique timbres.
- Phase: Phase describes the position of a point in time on the waveform cycle. Think of two identical waves – if one starts a little later than the other, it is “out of phase” relative to the first. Phase is a bit more technical, but it’s important when combining signals. For instance, if you record a guitar with two microphones, the sound may reach one mic slightly after the other, causing phase differences. If the waves line up in sync, they add nicely; if they’re out of phase, they can partially cancel each other (making the sound thinner). In analog audio, phase issues can affect how signals interfere or sum together.
These characteristics (amplitude, frequency, phase) fully describe a pure analog waveform. Analog audio signals are continuous, meaning they capture all the subtle variations in these characteristics over time without any gaps. This continuity is what often gives analog sound a certain smoothness or “natural” quality.
Advantages and Disadvantages of Analog Signals
Analog audio has its own set of strengths and weaknesses in music production. Let’s break them down:
Advantages of Analog Audio Signals:
- Continuous Signal: Analog captures sound as a continuous waveform, preserving very fine detail (in theory, infinite resolution). There’s no “stepwise” approximation – the signal is as smooth as the original phenomenon.
- Natural Sound and “Warmth”: Many musicians and engineers describe analog sound as warm or rich. Subtle imperfections like harmonic distortion from tubes or tape and slight noise can add pleasant color to music. For example, driving a tube amplifier a bit hard produces a smooth saturation that can make a guitar or vocal sound fuller. These are organically produced by analog gear and often considered musically pleasing.
- No Digital Artifacts: Analog signals won’t have issues like quantization error, aliasing, or digital latency (we’ll explain those later). If you overdrive analog tape or a mixer channel, it doesn’t immediately hard-clip; it gradually saturates, which can be more ear-friendly than digital clipping.
- Simple Connectivity: You can plug an analog signal from one device to another with a cable (given the levels match). There’s no need for conversion as long as everything stays in analog, so it can be straightforward to set up an all-analog signal chain.
Disadvantages of Analog Audio Signals:
- Noise and Distortion: Every analog component introduces a bit of hiss or hum (noise) and potential distortion. Over long cables or multiple pieces of gear, noise can accumulate. If you copy analog recordings (like dubbing tape to tape), each generation adds more noise and quality loss.
- Degradation: Analog media and signals can degrade. Tape wears out and loses high frequency content over time; vinyl records scratch and introduce pops/clicks; even analog electronic components can drift or add noise as they age. Maintaining analog equipment (calibrating tape machines, replacing old capacitors in mixers) is part of working with analog.
- Limited Editing and Flexibility: Editing analog recordings (like cutting tape with a razor blade and splicing) is labor-intensive compared to digital editing. You can’t instantly recall a mix setting on an analog console – you have to reset knobs and faders manually. This lack of instant recall and undo can slow down production workflow.
- Cost and Convenience: High-quality analog gear (preamps, analog compressors, tape decks) can be expensive and bulky. Also, analog setups typically require more outboard equipment and patching. In contrast, a laptop with software can emulate a room full of analog gear digitally at a fraction of the cost and space.

In short, analog audio offers a classic sound and continuity that many cherish, but it comes with challenges in noise, maintenance, and flexibility. In modern studios, analog equipment is often used alongside digital systems to get the “best of both worlds.”
Digital Audio Signals
Digital audio has revolutionized music production. Instead of a continuous electrical wave, a digital audio signal is a stream of numbers (data) representing that wave.
How Analog Signals are Converted into Digital Data (ADC Process)
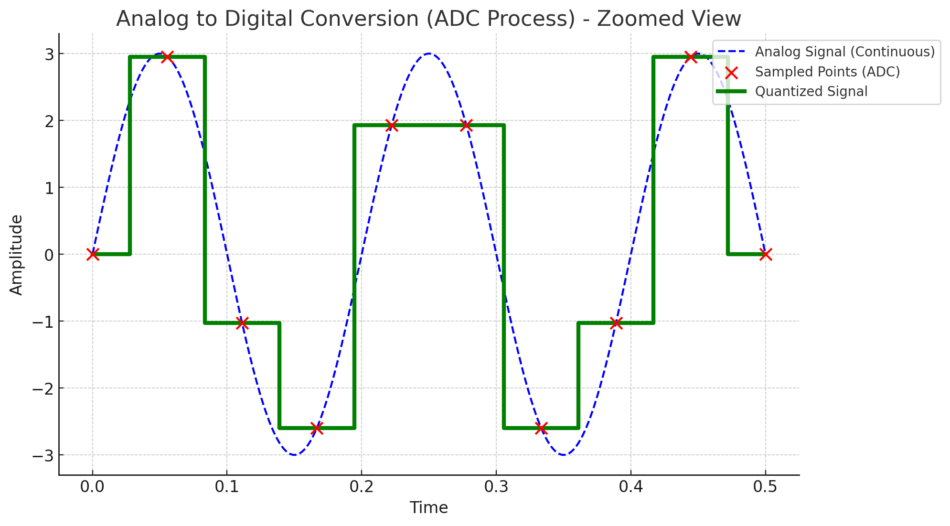
To get from analog (continuous voltage) to digital (data), we use an Analog-to-Digital Converter (ADC). This process is like taking a very fast series of snapshots of the audio waveform and recording the value of those snapshots as numbers. Here’s a simplified step-by-step of the ADC process:
- Sampling: The analog signal is measured (sampled) at very high speed – many times per second. Each measurement captures the instantaneous amplitude (voltage level) of the analog waveform at that moment. The speed of these measurements is the sample rate, measured in Hertz (samples per second). For example, a common sample rate is 44,100 Hz (often called 44.1 kHz), meaning 44,100 samples are taken every second. Each sample is like plotting a point on graph paper along the waveform. The higher the sample rate, the more closely these points can track fast changes in the sound (i.e., higher frequencies). According to the Nyquist-Shannon theorem, the highest audio frequency that can be accurately captured is roughly half the sample rate. So 44.1 kHz can capture frequencies up to about 22 kHz, which covers the full human hearing range. Pro audio often uses 48 kHz, 96 kHz, or even higher sample rates for extra fidelity or to reduce filtering artifacts.
- Quantization: Each sampled amplitude is then rounded off to the nearest available numeric value that the digital system can store. The precision of this value is determined by the bit depth. You can think of bit depth like the number of decimal places (though it’s binary). For instance, 16-bit audio can represent each sample with one of 65,536 possible amplitude values, while 24-bit audio has a vastly finer resolution with about 16.7 million possible values for each sample. Quantization is basically converting an analog voltage into a binary number. Inevitably, there’s a tiny rounding error unless the analog voltage exactly hit a representable value; this rounding difference is called quantization error, which manifests as very low-level noise in the background. Higher bit depths make this error so small that the noise is practically inaudible.
- Encoding/Storage: The stream of numbers (samples) is then stored or transmitted. This could be writing the data to a WAV file on your hard drive, sending it over USB from an audio interface to your computer, etc. The key is, once in digital form, the audio signal is just data – it can be copied, processed with software, or transmitted without any generational loss. It’s just ones and zeros at this point.
After these steps, we have a digital representation of our audio signal. To listen to it through speakers, the reverse happens using a Digital-to-Analog Converter (DAC): the numbers are used to reconstruct a continuous waveform (by smoothing them out through a filter) and output as an electrical signal that can drive a speaker or headphones.
Understanding Sample Rate and Bit Depth
Sample rate and bit depth are fundamental settings in digital audio signals that directly impact sound quality and file size, so let’s explain them in music-friendly terms:
Sample Rate
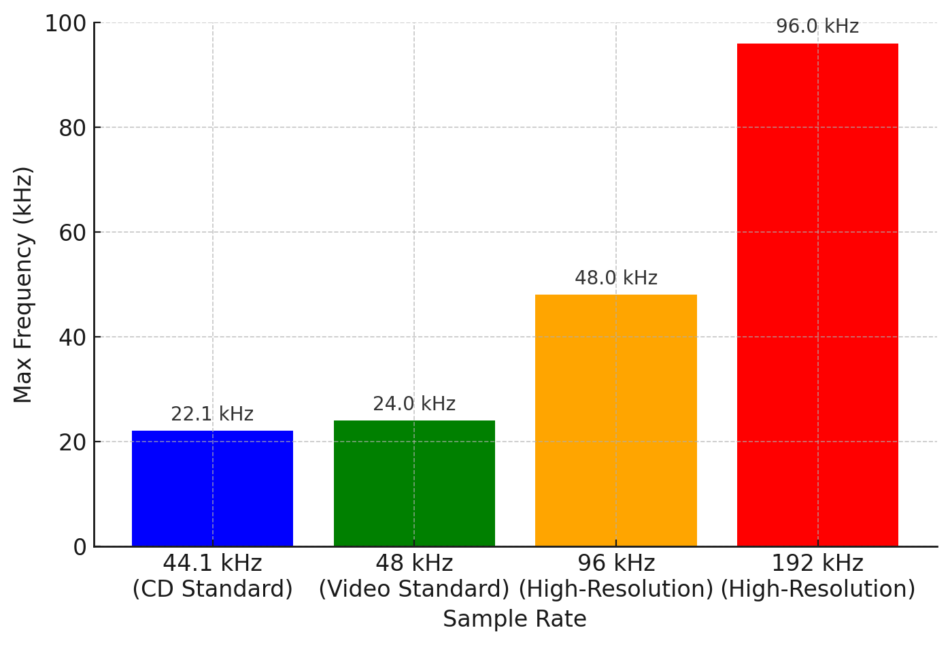
This is how frequently the audio waveform is sampled per second, measured in Hz. It’s analogous to the frame rate in video. A higher sample rate means more “frames” of audio per second, which can capture higher frequencies and more detail in time. Common sample rates:
- 44.1 kHz: Standard for CDs, sufficient for most music (covers up to 22 kHz frequencies).
- 48 kHz: Standard in video production and used in many studios; covers up to 24 kHz.
- 96 kHz and 192 kHz: High-resolution rates used in some professional recording and mastering. They capture supersonic frequencies (beyond human hearing). While humans can’t hear above ~20 kHz, these higher rates can make certain processing (like digital EQ or pitch shifting) a bit more accurate or reduce filter artifacts. The trade-off is larger file sizes and more CPU usage.
A key point: doubling sample rate doubles the data (and file size) without doubling audible quality beyond a point. For typical listening, 44.1 or 48 kHz is fine, but many producers record at 96 kHz for potential subtle benefits during mixing/mastering.
Bit Depth
This determines the resolution of each sample in terms of amplitude detail, analogous to how many different volume “steps” you can capture. It impacts the dynamic range (the difference between the loudest possible sound and the noise floor). Common bit depths:
This determines the resolution of each sample in terms of amplitude detail, analogous to how many different volume “steps” you can capture. It impacts the dynamic range (the difference between the loudest possible sound and the noise floor). Common bit depths:
- 16-bit: Has 2^16 (65,536) possible values for each sample. The theoretical dynamic range is about 96 dB. This is CD quality. 96 dB is a huge range (from a whisper to a jet engine practically). However, when recording and mixing, 16-bit can be a bit limiting if levels aren’t gained perfectly, because quieter details might get closer to the noise floor.
- 24-bit: Has 2^24 (~16.7 million) values per sample. Dynamic range jumps to roughly 144 dB, far exceeding what we encounter in real life (even a rock concert might be 110-120 dB at the loudest). 24-bit audio gives a lot of headroom. This is why virtually all studios record in 24-bit: you can leave healthy headroom (so you never clip the converters) and still have very low noise and great detail in quiet parts. It’s forgiving – you don’t have to ride input levels as hot as with 16-bit.
- 32-bit float: Some modern systems offer 32-bit floating point recording. This has an astronomical dynamic range (beyond any real-world scenario, essentially eliminating clipping within the recording software). It’s mainly useful to avoid clipping internally and give maximal processing headroom. But since 32-bit float files are large and most DACs are 24-bit max, this is overkill for delivery format. It’s more of a production convenience.
In short, sample rate affects frequency detail and bit depth affects volume detail. For music production, a high bit depth (24-bit) is standard for recording, and the sample rate can be chosen based on needs (44.1k or 48k often suffice, higher if needed for processing or specific projects). These settings ensure your digital audio is a faithful representation of the original analog signal.
Advantages and Disadvantages of Digital Audio
Now let’s consider digital audio’s pros and cons, especially in the context of music production:
Advantages of Digital Audio:
- Pristine Copies & Editing: Digital audio can be copied over and over with no loss in quality. Your 100th copy of a WAV file is byte-for-byte the same as the original. This is a game-changer from the analog days where each copy degraded. Editing is also incredibly easy – you can cut, paste, and rearrange audio in a DAW non-destructively, and undo any mistake. This flexibility has opened up creative possibilities like elaborate multitrack editing, time-aligning performances, pitch correction, etc., which would be extremely hard with analog tape.
- Low Noise and Wide Dynamic Range: With proper settings (24-bit or higher), digital recordings have an extremely low noise floor and a huge dynamic range. Essentially, if set up right, you won’t hear any hiss or hum inherent in the digital medium. You’re more likely to hear the noise of the mic or preamp than the digital system. Also, digital doesn’t add its own harmonic distortion when operating normally – what goes in is what comes out, very transparently.
- Convenience and Cost: All you need for a basic digital recording setup is a computer, an audio interface, and software (DAW). This replaces rooms of analog gear. You can have dozens of EQs, compressors, or virtual instrument plugins running simultaneously in a DAW – something impossible with only physical analog gear unless you have an enormous budget. Portability of digital audio is also a plus – you can send a mix to someone across the world via the internet, store entire libraries of music on a portable drive, etc.
- Advanced Processing: Some audio signal processes are only feasible in digital. For instance, digital signal processing (DSP) algorithms can do linear-phase EQ, automation, complex multi-band compression, or things like sound restoration (noise reduction, eliminating clicks) which analog can’t do as precisely. MIDI and digital instruments allow recallable, precise composition and sound design. In short, digital opens up a world of precision and possibilities.
Disadvantages of Digital Audio:
- Requires Conversion: To record or play sound, you must convert analog <-> digital. This conversion process, if not done carefully, can introduce issues. Early digital audio signal conversion suffered from lower resolution and noticeable artifacts. Modern converters are excellent, but if you use a low sample rate or bit depth, you can get aliasing (weird artifacts from frequencies above half the sample rate reflecting as false tones) or quantization noise (grainy low-level noise from low bit depth). We mitigate these with proper filtering and dithering, but it’s a technical consideration not present in pure analog signal paths.
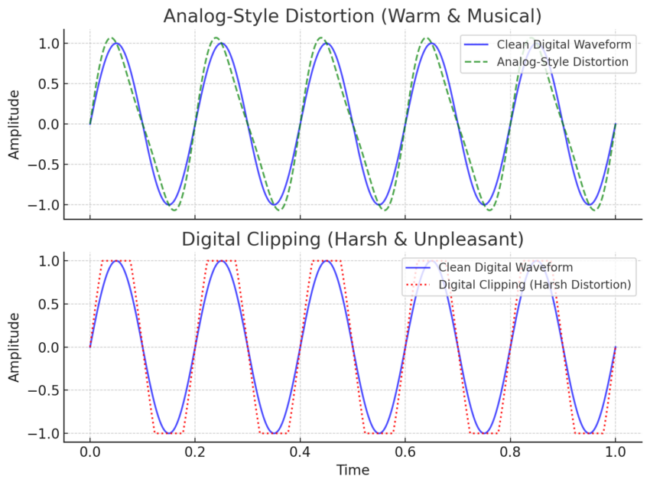
- Digital Clipping: In an analog system, if levels get too high, you often get a gentle saturation (as mentioned, it can even sound nice). But in digital, if you exceed the maximum level (0 dBFS, decibels full scale), you get clipping – the waveform is chopped off flat at the top. Digital clipping sounds harsh and is usually very undesirable (think of a scratchy distortion). There’s no graceful overload; it just hits a wall. So engineers must be cautious to leave headroom and prevent any sample from going over the limit. Fortunately, with 24-bit, leaving, say, 6-12 dB of headroom still results in great quality.
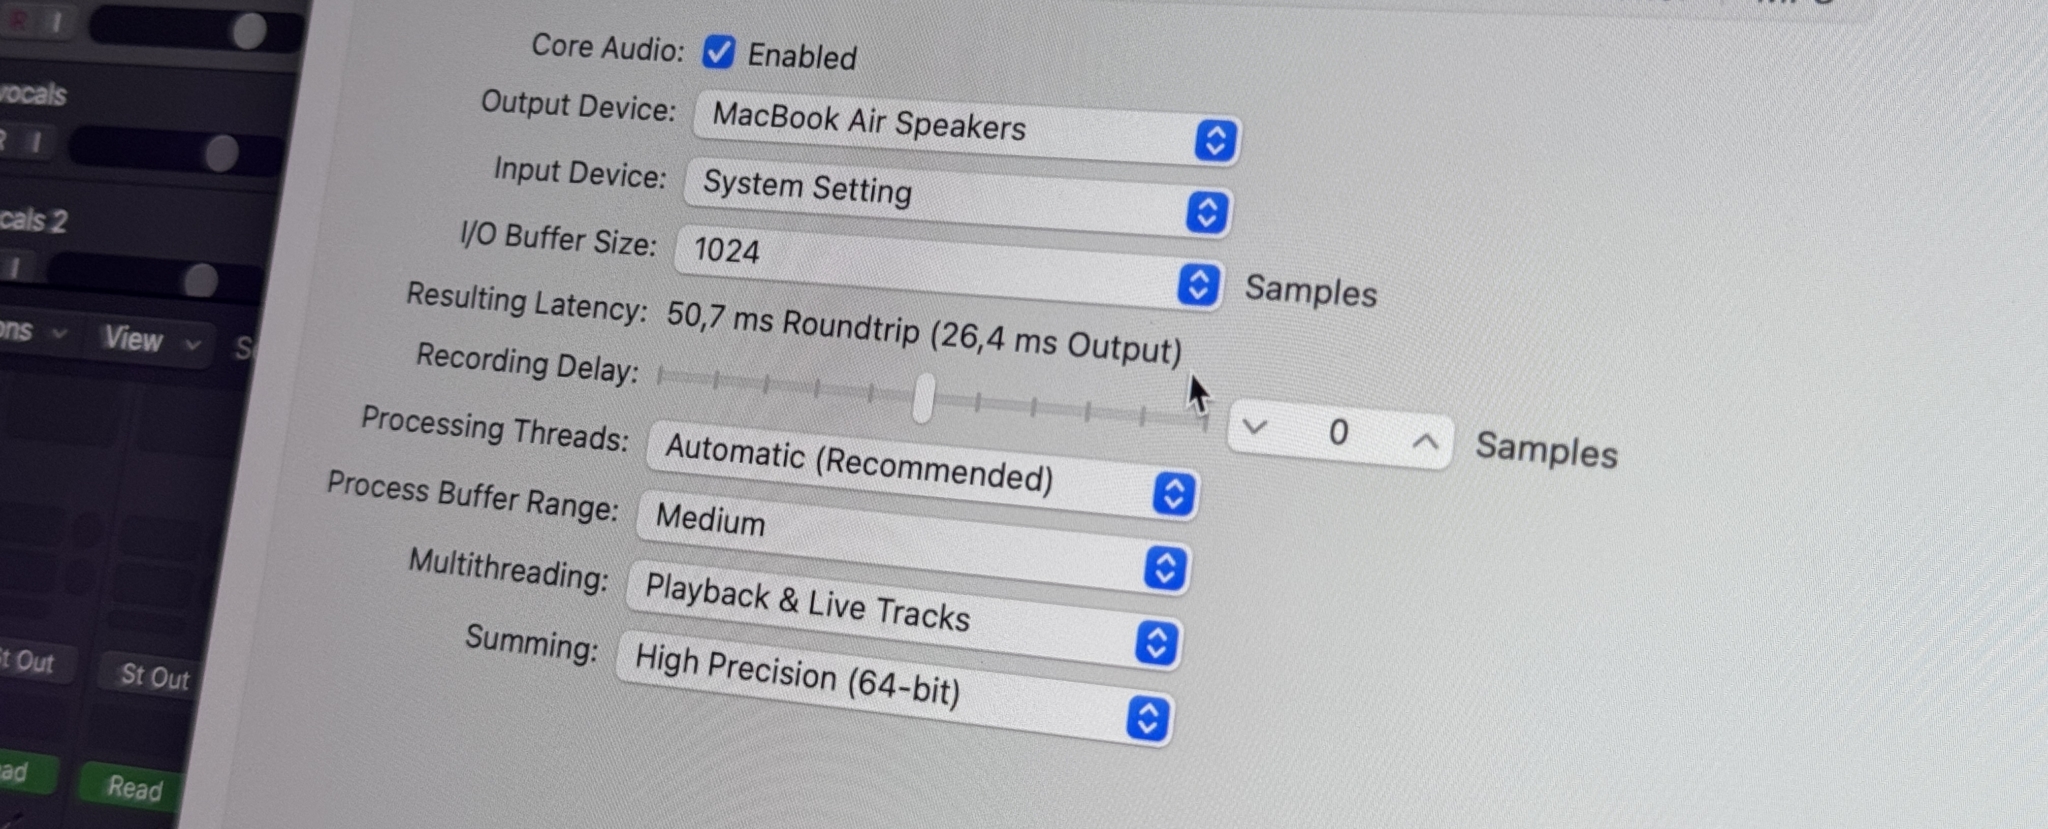
- Latency: Digital systems introduce latency (delay) because of buffering and processing time (more on this later). When you run audio signals through a computer, it might come out a few milliseconds (or tens of ms) later than it went in. In analog, the delay is essentially instant (electronic signals travel extremely fast). Latency can be an issue when overdubbing or using live monitoring through a DAW – if the delay is too high, it can throw off a performer’s timing or be heard as an echo.
- Potential for Technical Glitches: Digital audio relies on software, drivers, and clock synchronization. We’ve all heard glitches like pops, clicks, or dropout when a computer can’t keep up or a clock sync fails. For instance, if your CPU is overloaded with plugins, you might get buffer underruns causing audible ticks. Or if two digital devices (say a digital mixer and an audio interface) aren’t clocked together, you get periodic pops. Analog systems, by contrast, might hum or hiss, but they won’t suddenly output a burst of digital noise or stop because of a software crash. Managing a stable digital system requires some technical know-how (optimizing buffer sizes, using the right drivers, etc.).
All in all, digital audio signals offer superb fidelity and convenience, but you have to mind levels and system settings. It’s the dominant medium today for good reason – its advantages outweigh the drawbacks for most applications – but smart producers and engineers learn how to avoid the pitfalls (like clipping and latency) and even combine analog elements when desired.
Digital vs. Analog Signal Distortion and Noise
Every audio signal has some distortion and noise – but the type and character differ greatly between analog and digital, and understanding this helps in troubleshooting and in creative decisions:
Analog Distortion/Noise
In analog systems, distortion usually comes from overloading a component. For instance, pushing a preamp too hard can saturate its transformers or tubes, yielding a warm overdrive (a form of harmonic distortion where new frequencies – often musically related overtones – are added). Tape saturation is another form: when the tape is driven with a hot signal, it starts to compress and gently distort the peaks, creating a pleasant tape warmth. These distortions are generally gradual – the more you push, the more distortion, so it’s somewhat forgiving. A lot of beloved analog gear intentionally adds a bit of harmonic distortion even at normal operating levels (e.g., an analog EQ circuit might not be perfectly clean, which can add character).
Analog noise typically is heard as a hiss (white noise from electronic components), hum (from mains electrical interference), or random crackles (if something’s faulty). The important part: analog noise is usually low-level and uncorrelated with the signal (just a background hiss), and analog distortion often has a soft-clip character. Our ears tend to tolerate or even enjoy small amounts of these artifacts. That’s why guitarists love tube amp distortion, and mixers appreciate the glue of analog tape or console saturation. There is a limit, though — too much distortion and it becomes obviously broken-sounding, too much noise and it masks the music. Thus, analog engineers aim for a good signal-to-noise ratio (record signals “hot” enough above the noise, but not so hot as to distort badly).
Digital Distortion/Noise
In the digital domain, ideal processing introduces no noise or distortion at all (digital math can be perfectly transparent). However, issues arise mainly at the conversion stage or if levels are mishandled:
Clipping
As noted earlier, if a digital signal exceeds 0 dBFS, it clips. Digital clipping is abrupt – the waveform is flattened at the top, resulting in a very harsh, buzzy distortion that usually sounds bad. Even a momentary clip (one sample) can produce a high-frequency tick. So digital audio singals demand that you prevent clipping by leaving headroom or using limiters.
Quantization Noise:
At lower bit depths, the rounding off of samples adds a kind of grainy noise. If you record at 8-bit for example, you’d hear a lot of noise because 8-bit has only 256 levels and the wave is very coarsely approximated. At 16-bit and above, quantization noise is so low it’s typically inaudible, especially if dither is used. Dither is a technique where a tiny bit of noise is added before quantization to randomize the error, which paradoxically makes the quantization noise less noticeable by preventing correlated distortion. In practice, just know that if you export to 16-bit (like for CD), adding dither in the final step preserves the audio quality by reducing quantization artifacts.
Digital Audio Artifacts
If something goes wrong in digital processing, you might get very non-analog types of distortion: for example, aliasing (when high frequencies fold back into lower frequencies due to insufficient filtering or too low a sample rate – it might sound like weird inharmonic tones that shouldn’t be there). Or jitter, which is timing irregularity in the digital clock, causing slight distortion or widening of the noise floor. These are technical, and modern systems are designed to minimize them (e.g., good ADCs have filters to prevent aliasing, stable clocks to avoid jitter, etc.).
Background noise
Digital itself doesn’t add hiss, but your analogue front-end (mic, preamp, etc.) still does. In a quiet recording, what you perceive as “noise” in a digital recording is often just the microphone’s self-noise or ambient room noise captured, not the digital medium. Digital noise floor at 24-bit is so low (-144 dBFS) it’s virtually zero relative to any real sound. So if you hear hum or hiss in a digital recording, it’s not the “digital” part doing it; it’s likely the analog part of the chain or perhaps the noise shaped by dithering (which is very subtle).
Summing up Distortion/Noise
Analog distortion and noise can add flavor (to a point), whereas digital distortion is usually something to avoid (except creative effects like digital bit-crushers which intentionally reduce bit depth for a gritty sound). Many plugins today emulate analog distortion precisely because pure digital is sometimes too clean. Producers will use tape emulation or tube amp plugins to get that analog mojo intentionally. The goal is to use the strengths of each: keep things clean and noise-free in critical parts of the chain with digital, and add analog-style distortion where musically appropriate.
Conclusion
Audio signals – whether analog or digital – are at the heart of capturing and creating music. As we’ve explored, analog signals are like the natural language of sound, with smooth continuous waves that have been used for over a century of recording, while digital signals translate those waves into the language of computers, bringing incredible precision and flexibility. In modern music production, the two often coexist: microphones and instruments start as analog, get converted to digital for editing and mixing, and sometimes are sweetened again with analog gear, before finally reaching our ears through analog speakers.
For beginners, it’s important not to be intimidated by the technical terms. Concepts like amplitude, frequency, sample rate, and bit depth might seem abstract, but they boil down to loudness, pitch, and quality settings that you can understand and hear with practice. This article dived into beginner-friendly explanations and also touched on intermediate/advanced details (like phase, dithering, aliasing, etc.) so you have a roadmap for deeper learning. Don’t worry if you don’t grasp it all at once – understanding audio signals is complicated, and even seasoned engineers keep learning new things.
Over de auteur

Dídac
CEO & oprichter van MasteringBOXDídac is een professionele audio-engineer, muziekproducer en software-engineer. Hij is de oprichter van MasteringBOX en auteur van veel artikelen op de blog.
Laat een reactie achter
Log in om een reactie te plaatsen