When we talk about stereo balance in music production, we’re focusing on how sounds are distributed and perceived within the left and right channels of a stereo system. It’s about more than just “panning a guitar left”; it’s about giving each instrument or element in a mix its own space so that the overall sound is clear, immersive, and emotionally engaging. Stereo balance can make a track feel wide and alive—or, if done poorly, narrow, cluttered, or lopsided.
Whether you’re a beginner learning how to position instruments or an advanced mixer looking for that last bit of polish, an understanding of stereo balance is crucial. In this guide, we’ll move from the fundamentals to more technical strategies, ensuring that each level of experience has something valuable to take away.
Table of Contents
- Understanding Stereo Balance
- Basic Panning Techniques
- Advanced Stereo Width Techniques
- Automation and Movement
- Stereo Balance: Tools and DAW Approaches
- Best Practices and Final Tips
- Conclusion
Understanding Stereo Balance
Stereo balance is basically the art of positioning instruments and sounds across the left-right spectrum. Unlike a mono setup, where all sounds come from one channel, stereo uses two channels to create a sense of direction and space.
Why Stereo Balance Matters
A balanced stereo image can:
- Help each instrument stand out (avoiding a muddy, center-heavy mix).
- Deliver a more realistic or 3D listening experience.
- Maintain clarity even if the track is played in mono (for instance, on a smartphone speaker or in a club environment where bass might be summed to mono).
When done right, stereo balance gives the impression that each musical element has its own spot on a virtual stage. This makes the listener feel as if they’re in the middle of the performance. Conversely, poorly balanced stereo can disorient the listener or cause ear fatigue if one side is overly emphasized.
The Concept of Panning
Panning is the simplest and most common tool for achieving stereo balance. Every DAW provides some sort of pan knob for each channel, allowing you to decide how much of the signal goes to the left channel and how much to the right. Sometimes, especially for stereo tracks, these knobs function as a balance control rather than a true dual-panner. Regardless, panning is your first step in deciding “who stands where” in your sonic landscape.
Basic Panning Techniques
When you’re just starting to pan instruments left or right, a few foundational principles can help you avoid a lopsided or muddy sound. While these are guidelines rather than rules, they’re a good starting point until you develop your own approach.
Center the Essentials
Most mixers keep vital elements—like lead vocals, kick drum, snare, and bass—close to center. This ensures that crucial rhythmic and melodic parts don’t feel off-balance or thin. A centered lead vocal, for instance, is often perceived as the primary focus in a song, while keeping low-frequency elements in the middle provides a stable anchor to your mix.
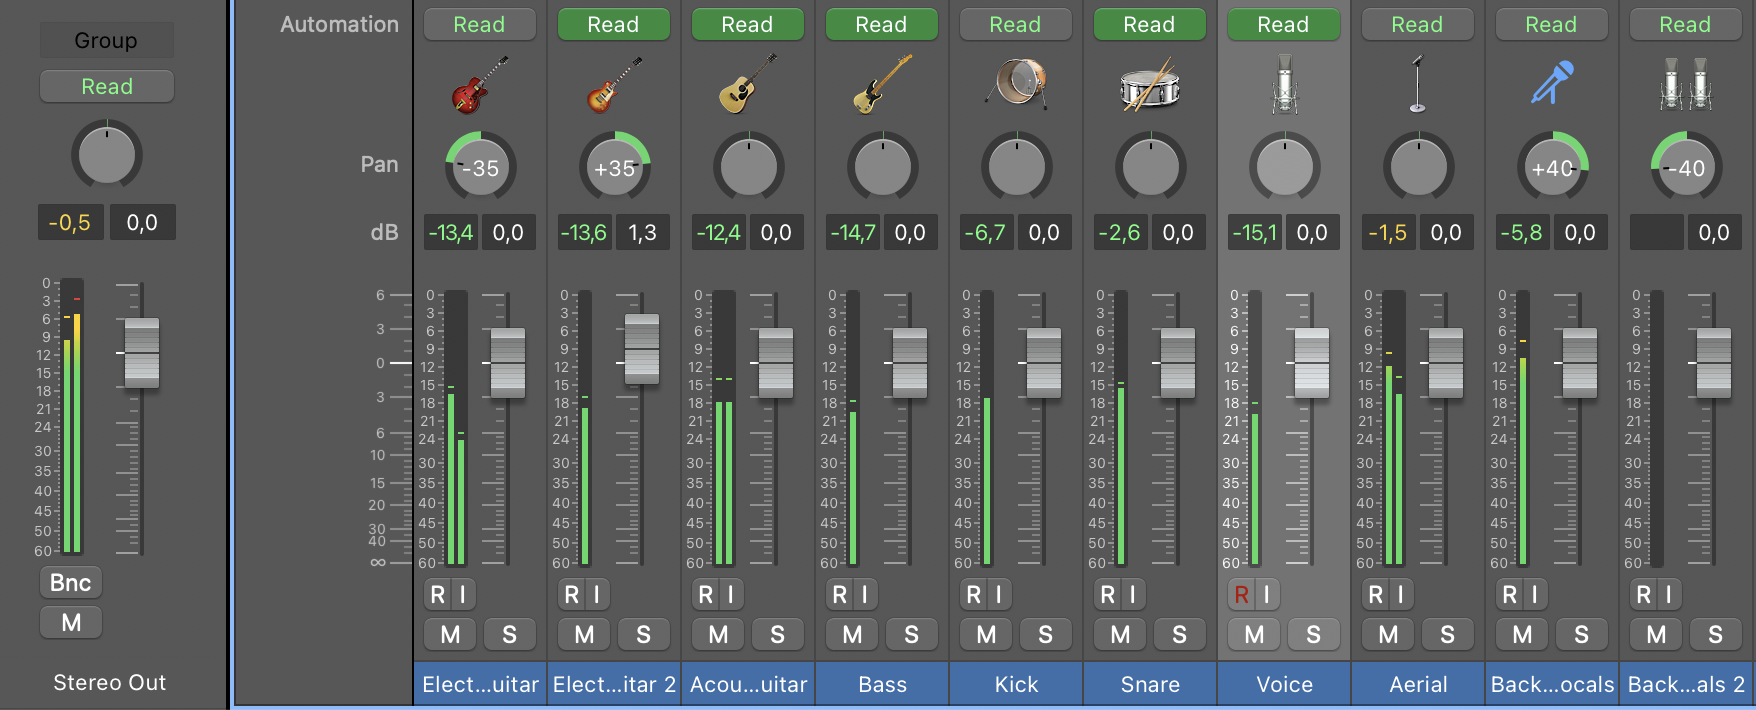
Balance Supporting Instruments
Pan supporting instruments such as rhythm guitar, piano, synths, and background vocals can be moved left or right to create space for the center-focused elements. For example, one guitar could be panned moderately left and another moderately right, creating a stereo “conversation” that gives each part breathing room. This also helps avoid frequency masking in the middle of the mix.
LCR (Left-Center-Right) Panning
One specific technique is LCR panning, which places sounds in only three positions:
- Hard left (100% left)
- Center (dead center)
- Hard right (100% right)
The theory is that by only using these extreme or central positions, you maintain clarity—each instrument sits clearly in its own space. You might adapt this slightly to modified LCR by letting some elements find positions in between if they feel too extreme. Ultimately, you don’t have to be a strict LCR purist, but trying it out can help you notice how placing elements at the extremes increases separation.
Checking in Mono
One of the biggest secrets to effective stereo balance is regularly checking your mix in mono. When you collapse your mix to mono, panned instruments drop in level and overlapping frequencies reveal themselves more starkly. If a crucial part vanishes or sounds hollow, you might have a phase issue caused by certain stereo widening tricks. A common adage says if it sounds good in mono, it’ll usually sound great in stereo. Mono checks help ensure your mix maintains consistency across different playback systems.
Advanced Stereo Width Techniques
Once you’re comfortable placing each part in the stereo field, you can explore ways to widen or enhance that image. Techniques like the Haas effect, double-tracking, and micro-shifting all help certain instruments sound bigger and more enveloping. However, with any widening approach, it’s important to remain vigilant about phase issues and mono compatibility.
Haas Effect
The Haas effect involves duplicating a mono track, panning one copy hard left and the other hard right, then delaying one side by a very small amount (typically 5–30 milliseconds). Our ears interpret these nearly simultaneous signals as a single, wide stereo image. It’s a quick and easy way to achieve spaciousness, but it can cause phase cancellation in mono. So always check to see if you’re losing important parts when summing to mono.
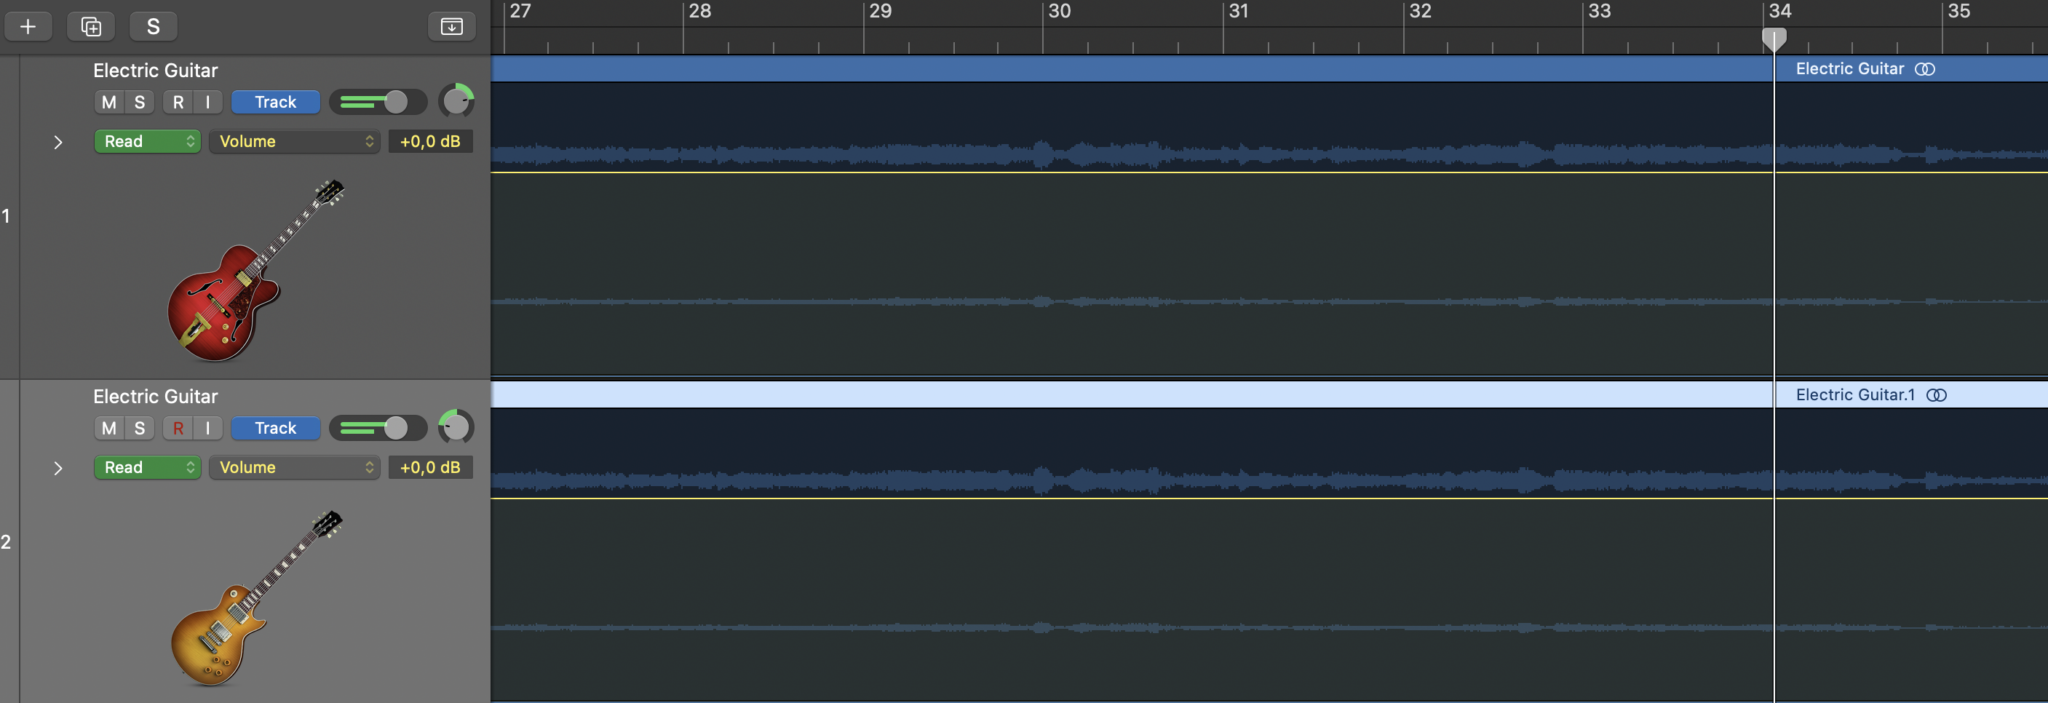
Double-Tracking
In many rock and pop productions, guitars and vocals are double-tracked for a bigger stereo sound. Instead of relying on signal processing, you record the part twice (or more) and pan each take left and right. Subtle timing and tonal variations create natural width that doesn’t usually suffer as much from mono-related phase problems. Though more effort is required, double-tracking often offers a more organic result compared to automated stereo effects.
Micro-Shifting
Micro-shifting is similar in spirit to the Haas effect but uses pitch rather than time delay. You detune one side slightly above and one side slightly below the original pitch. This small pitch shift gives the impression of breadth and motion. Certain plugins provide micro-shift options with controls for blend, detune depth, and even modulation. This approach can be fantastic for adding stereo interest to lead vocals or synth parts that feel too static.
Stereo Reverb and Delay
Many reverb and delay effects are stereo by default, automatically adding dimension to your mix. For example, a ping-pong delay bounces echoes between the left and right channels, creating a sense of space. A stereo reverb return can wrap an instrument in a wash that extends across the entire stereo field. Be careful to avoid washing everything in the same wide reverb, as it can smudge the overall mix. Sometimes using a more targeted or even mono reverb placed strategically can add depth without losing clarity.
Mid/Side (M/S) Considerations
Mid/Side processing splits your stereo track into two components: the “mid” (the sum of the left and right channels) and the “side” (the difference between them). By boosting the side channel, you can increase stereo width. You can also EQ or compress the mid and side independently, giving more control over how wide or centered certain frequencies sit. This approach can be particularly powerful for mastering, or for subtly shaping a busy mix. Overdoing side levels, however, can make a track sound hollow in mono.
Automation and Movement
Static panning can be effective, but automating panning, widening, or reverb sends can add a layer of excitement and surprise to your mix. Subtle motions, like a gently swaying synth or automated panning on a hi-hat, can keep listeners engaged. More pronounced moves, like a wild left-right sweep on a riser, can underscore a dramatic moment in the arrangement.
Auto-Panning
Auto-panning plugins or LFO-based automation systematically move a sound across the stereo field. For example:
- A slow auto-pan on a sustained pad can gently drift it around the listener’s head.
- A faster tempo-synced auto-pan on a hi-hat can make the groove bounce.
While auto-panning can be hypnotic, it’s easy to overdo. Keep an eye on the depth of the effect to avoid a disorienting experience, especially on key elements like lead vocals.
Evolving the Stereo Field
Automation can also transform the stereo field over the course of a song:
- Narrow in the verses to create intimacy, and widen out in the chorus to feel expansive.
- Increase stereo width gradually during a build-up, then collapse briefly before a drop for a dramatic impact.
Such changes highlight the arrangement’s emotional arc. Carefully consider how each transition serves the song’s narrative. If a piece feels static, a little stereo movement can breathe life into it without distracting from the core musical elements.
Reverb and Delay Automation
You can automate reverb sends or delay feedback to pull certain parts closer or push them further away. For instance:
- Increase reverb on a vocal line toward the end of a phrase, letting it trail off into the background.
- Momentarily boost delay feedback on a guitar solo for a bigger, more epic moment, then bring it back to normal.
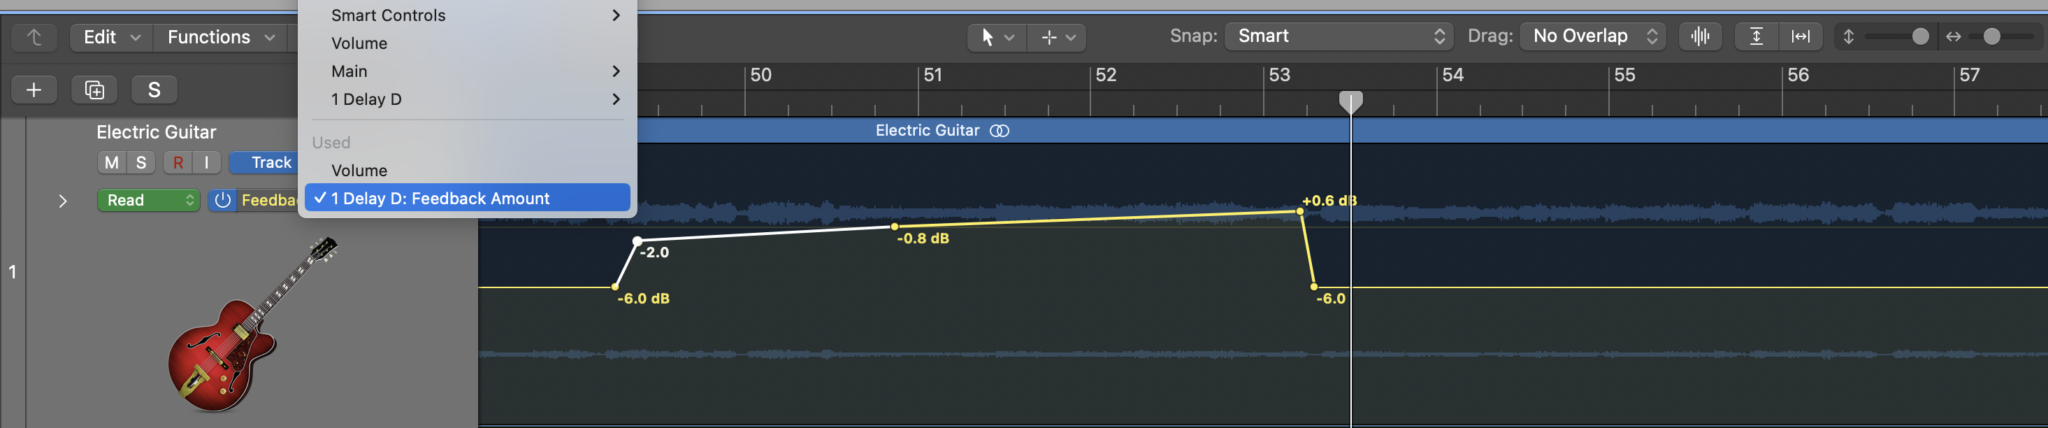
These moves are best used sparingly so that they stand out when they occur. They can serve as sonic highlights and help differentiate various sections of a track.
Stereo Balance: Tools and DAW Approaches
Every DAW—Ableton Live, FL Studio, Logic Pro, Pro Tools, or others—offers slightly different ways to control stereo balance. Most have built-in panning, width controls, and a variety of effects. While the core concepts remain the same, each DAW’s implementation can vary. Below are brief overviews of how you might handle stereo balance in some popular DAWs.
Ableton Live
- Pan vs. Balance Control: By default, track panning behaves as a balance knob. However, you can right-click and convert it to a Stereo Pan mode for true dual-panning of stereo material.
- Utility Device: Offers a Width parameter to narrow or widen a track’s stereo field.
- Auto Pan Effect: Provides an easy way to create automated left-right movement.
- Checking Mono: You can insert a Utility and set the Width to 0% to monitor in mono.
FL Studio
- Pan Knob & Stereo Separation: Each mixer channel has a pan knob and a separate Stereo Separation control. Turning Stereo Separation to the left increases width; turning it right moves the track toward mono.
- Fruity Stereo Shaper: Allows you to introduce delays and phase manipulations to broaden or narrow a signal.
- Easy Automation: FL allows you to create automation clips for nearly any parameter, making it simple to add stereo movement across a timeline.
Logic Pro
- Stereo Pan vs. Balance: Logic’s standard panner on stereo tracks is a balance knob, but you can switch to Stereo Pan for more precise placement.
- Direction Mixer: Lets you control the spread (width) of a stereo track and shift its overall direction.
- Sample Delay: A straightforward way to apply the Haas effect by delaying one channel by a few milliseconds.
Pro Tools
- Dual-Pan Knobs: Stereo tracks have two pan knobs, one for the left channel and one for the right, giving you detailed control.
- Multi-Mono Plugins: You can run plugins in multi-mono mode to process left and right channels (or mid and side channels) separately.
- Mono Check: Often done through routing or a dedicated plugin, as Pro Tools doesn’t have a built-in mono switch.
Best Practices and Final Tips
Begin with basic pan placements and volume balancing. Ensure each element has its place without too much overlap or frequency masking. Sometimes a straightforward approach yields the most natural results, and advanced techniques should complement this foundation rather than replace it.
Use your ears to achieve Stereo Balance
While many DAWs offer stereo meters or correlation tools, the final test is how the mix sounds. Stereo imaging plugins and visual feedback are helpful, but if the track feels lopsided or lacks cohesion, trust your ears more than the meters.
Mono Compatibility
Periodically check how the mix collapses into mono. This step helps you catch phase cancellations that can significantly reduce the presence of certain sounds. If your guitars, vocals, or other key elements vanish or become weirdly thin, revisit your stereo widening processes or consider layering a centered signal underneath.
Moderate the Wide Effects
It’s tempting to make everything super-wide, but if everything is wide, nothing will stand out as wide. A mix that has both narrow/centered sounds and wide elements feels broader overall. Similarly, too many stereo reverbs or stacked widening plugins can create a murky wash. Use widening strategically to highlight specific instruments.
Enhance the Song’s Emotional Arc
Remember that stereo balance is one of many tools for expressing the vibe of a track. Think about how each section should feel. Is the intro supposed to be intimate and close? Is the chorus meant to explode into a wide, engulfing space? Align your stereo decisions with those emotional goals.
Experiment and Break Rules
Ultimately, mixing is a creative art, and some of the most iconic records feature non-traditional panning choices. Embrace experimentation—maybe it’s panning a lead vocal off-center or flipping the typical drum panning perspective. If it suits the song and sounds good, do it.
Conclusion
Achieving a compelling stereo balance involves a blend of artistry and technical know-how. By understanding the basics of panning, learning how to use advanced widening and depth techniques responsibly, and taking advantage of automation for dynamic movement, you can craft mixes that are both immersive and mono-compatible.
Whether you’re just starting out or already seasoned in the craft, continue to refine your instincts. Experiment with different DAW tools, keep checking your work in mono, and let your ears guide you toward the stereo sweet spots that make the music come alive.
In the end, stereo balance is a journey—one that’s always evolving as you discover new techniques and keep pushing your mixes to sound bigger, clearer, and more engaging than ever.
À propos de l'auteur

Néstor Rausell
Chanteur, Musicien et Spécialiste en Marketing de ContenuNéstor Rausell est le chanteur principal du groupe de rock "Néstor Rausell y Los Impostores". Il travaille chez MasteringBOX en tant que spécialiste en marketing.
Laisse un commentaire
Connecte-toi pour commenter.