Mixing with EQ properly and effectively is a dark art and precisely knowing how to use EQ properly, when, and on what instrument is one of the hardest aspects of balancing a mix to make it sound as good as possible. EQ is one of the two fundamental tools used in making a recording sound livelier and more musical, sitting alongside compression. Other things like reverb and spatial effects are also very important. Before of all of those, though, knowing how to use EQ in your mix will be your first step to the best results. Here is an in-depth guide on types of EQ and their individual functions so you can prepare yourself for mixing with EQ.

Mixing with EQ properly has many benefits
- You allow instruments to balance tonally by carving spaces for them to sit alongside each other in the frequency spectrum. Imbalanced instruments will sound odd when playing together – for example, a loud synth and guitar can’t sit in exactly the same areas of the frequency spectrum without clashing. Mixing with EQ allows you to shape the frequency spectrum in a musical way.
- You open up a lot of headroom by cutting unneeded frequencies. Bass frequencies, in particular, will eat up your headroom, essentially meaning less space for other sounds. This results in a muddy, undefined mix.
- You can accentuate particular parts of a mix to make them louder, crisper and more defined.
- EQ doesn’t benefit every situation equally. How you use EQ depends entirely on the source audio.
Kick Drum
It’s often sensible to start off with your kick tracks. Kicks are loud transients with lots of bass and if left un-EQ’d, they’ll wreak untold havoc in your mix. Firstly, kicks aren’t just bass. They contain a lot of bass frequencies, some thumpy mid-frequency content and some high-frequency content which gives a kick some airy punch. It’s best to start by high-passing around 25Hz – the sweet spot will depend on your bassline but more often than not, having kick info below this point is relatively inaudible and takes up a lot of headroom. Mixing with EQ to remove lots of low-end is tempting but try not to thin out your kick too much.
Some kicks really need that high-end to help them punch through a mix. If you have a lot of frequency information from pads and percussion sitting in that same zone, that top-end will become somewhat lost. If you don’t need it, you can low-pass a kick around 2-4kHz.
The mid-frequency part of a kick around 200 – 250Hz is commonly referred to as ‘muddy’ – these frequencies aren’t always that useful and are neither bassy nor punchy so you can often cut in this area.
Snares
Snares, in particular, usually require mixing with EQ alongside other techniques to place them properly into the mix. A snare is a complex transient sound. It contains a lot of body in the mids and a lot of high-end, all of which occurs in a fraction of a second. Once again, tonal balancing is needed and we can often home in on resonant frequencies that lie between 1 – 5kHz in order to eliminate some ring. If we then move down, we can often cut around 100hZ comprehensively to get rid of unneeded low-mids and bass. A notch around 400Hz can help balance your high-frequency cut.
Percussion and tom-toms
Drums, percussion, and cymbals are complex in their frequency content. Often, there’s plenty of mid and high frequencies coming from toms, room mics and cymbals and they include a lot of transient sounds. Learning how to mix with EQ on your drums together will take time but it’s really worth it to reveal their details whilst stopping them from clashing. Mixing whole percussion tracks or drum kits takes time to master and depends on how your material was recorded, here’s an excellent guide on recording big drums from the outset.
Cymbals
Cymbals have plenty of content about 12-16kHz that keep them sparkly and fizzy. It’s surprising how much bass can build up from percussion tracks or busses that feel decidedly in the high-end, though. Often, low-passing as much as you can is an easy way to keep them from clashing with pads and synths which sit in the mids. You wouldn’t want to take too much out though, as this could make them scratchy and very thin. Sometimes, there are buildups in the super-high frequency part of a mix above 16-18kHz, too. These are caused by stacking cymbals and percussion along with additional noise introduced from some plugins. Some like to just cut everything below 18kHz – anything above that isn’t audible to everyone and can often be unpleasant.
Bass guitars
It’s a similar story with a bass but be careful and concentrate more on tonal shaping than cutting large areas of a bass’ frequencies. This means using a spectrum analyzer to see where exactly your kick and bass guitars intersect so you can slightly notch your bass guitar track in that area. Mixing with EQ on the bass guitar depends on the high-end snappiness or the low-end bass you need for your mix. Boost the lows for more thud and boost the upper-middle frequencies for more snap and string volume. For more info check this article on 3 steps to mix bass.
Guitar

Mixing guitars are often intricate and a focal point of the mix. Not only that, but many mixes contain rhythm and lead parts. It can all get very tricky if you don’t know how to use EQ on your guitars carefully from the start.
Firstly, no guitar should need bass info unless it’s a solo part or part of an acoustic song and even then, frequencies below 90Hz are seldom required. Cut them out first and then look at the 2kHz – 4kHz zone. This area dictates how much ‘shred’ your guitar has – the meaty area for which our ear is particularly sensitive to. Boost it and you gain emphasis but too much will sound pretty horrible. Anything above 10kHz is hard to treat – remove too much to dull and tighten your guitar sound and your guitar will lose presence in the high notes.
Mixing with EQ on your guitar needs to be carried out in the context of your mix. Don’t do it in solo mode.
Synths
Pads and synth sounds are mostly meant for the mid-range. They’re often thick sounds which have texture, impact and natural size and loudness. A very large pad sound which is untamed with EQ can smother your drums, though. Often, these sounds have low-end content which isn’t really needed in most music as you have kicks and bass down there. High passing around 250Hz, or higher at around 350Hz, is a good idea. You will need to check the timbre of your pad or synth and if it sounds like you’ve shifted the pitch of the sound then you may have removed too many low harmonics. This is where tonal balancing comes into play and it really is one of the hardest things to master – more on that later.
In a nutshell, you will have to refer back to your full mix and see how your pad and synth sits in terms of its tone, timbre, and pitch. If you cut low frequencies and it makes it sound too high in pitch, then you will have to make a counter cut in the high-end or upper-middle frequencies. This balances out your equalization – you are essentially balancing the harmonics. If you cut too much high-end and the sound feels too low in the mix then you will need to cut some low end to compensate. Mixing with EQ is about finding the sweet spots – if you end up with a mishmash of loads of little cuts and boosts then it can be good to start again.
Basslines and Subs
Basslines are tricky – do you cut the midrange to stop your kick from losing its thud? Do you leave mid and high frequencies in your bassline to keep its presence? It’s a hard one…
Firstly, it’s a good idea to drop ultra-low frequency content below 30Hz. Most sound systems don’t accurately produce much volume below this frequency so it is taking up more room in your DAW than is useful. Of course, some sound systems can hack it and cinema sound systems make good use of this zone but in music, it’s seldom needed. Many basslines have a thick and fuzzy area around 200-250Hz and much the same as a kick, it can often be cut with beneficial results. Knowing how to use EQ on a bassline or sub will keep your low-end clean and clear for when it’s pumped out of a sound system. Once again, when mixing with EQ on a bassline, it’s difficult to know how much low end to remove to clean it up. Usually, just concentrate on remove info below 30Hz.
When it comes to mixing subs and bass lines, EQ along with side-chain compression will get you the best results.
Brass and Woodwind
Brass and woodwind instruments can create huge sounds that are loud and impactful. Think about the sax solo in Baker Street for which Raphael Ravenscroft famously received £27 for – it’s such a memorable riff.
Brass and woodwind have tremendous warmth, some boost in the 200Hz – 400Hz region in single mic recordings to bring it out. If you’re using multiple mics then this isn’t always necessary, though, as the warmth and body will be captured sufficiently. Of course, the type of woodwind or brass instrument affects how to use EQ greatly! There is never a one-size-fits-all EQ set-up.
Vocals
Arguably one of the most tonally complex elements of any mix is its vocals. Recording vocals is also tricky and will change the sound depending on the microphone and positioning. Short vocal samples are obviously EQ’d differently to a full choir but the challenges remain similar as vocals sound unnatural quickly if they aren’t EQ’d properly. Knowing how to use EQ for vocal tracks depends on their focus. Are they for ambiance or do they drive the song?
High-pass is a good place to start. Anything below 60Hz is very rarely needed in a vocal track. Some vocals sound harsh and treating the area around 2.5kHz to 4kHz is a good place to start to reduce this. Often, compensating this cut with a boost to frequencies above 6kHz can achieve brightness without harshness.
Cutting in the 1 – 2kHz zone can smoothen things out and remove some mid-high frequencies that are quite vague. Finally, if you have a song which needs a very loud, large vocal part then boosting the bass from 200Hz to 600Hz can pump some energy into your vocal part.
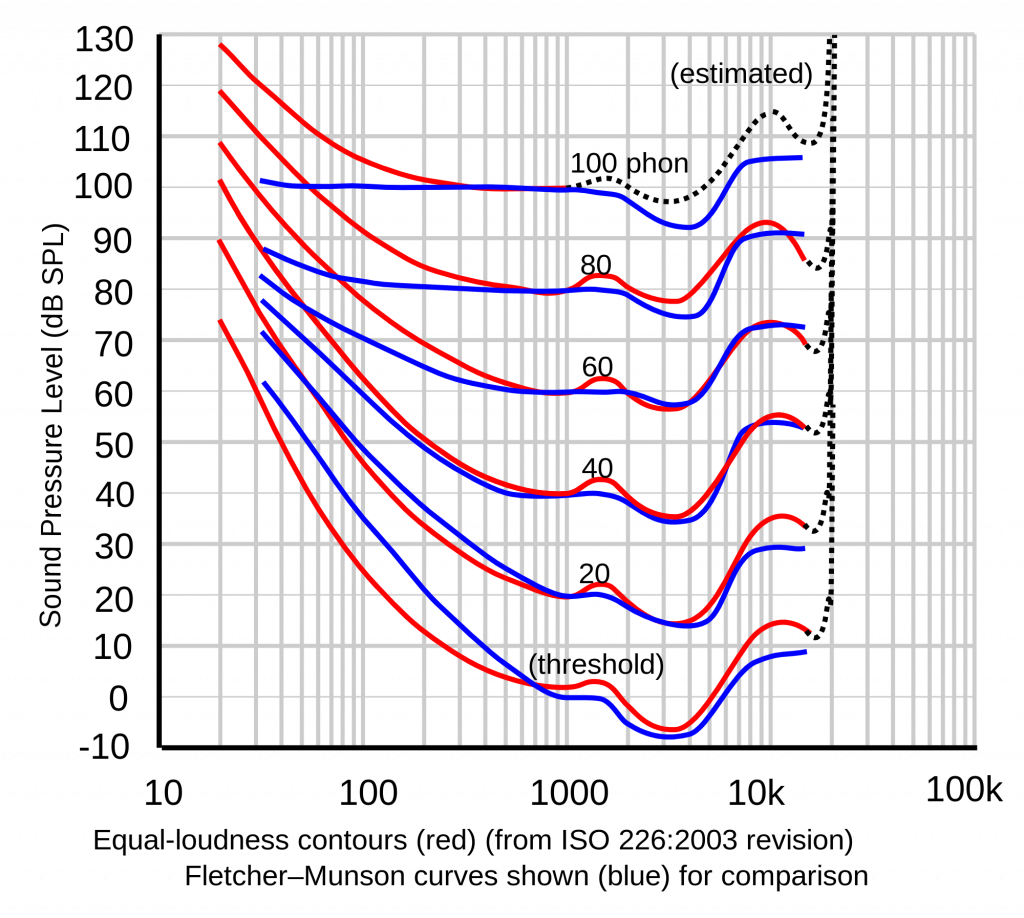
Most instruments sit in the middle or high part of the frequency spectrum. Our voice lies around 2kHz – 4kHz and because of this, this area is particularly sensitive to us. The mid frequencies that run all the way up to that band is an extremely important part of the mix. A mix with full and controlled mid frequency content will sound warm and full. Note in the below diagram that this region requires less volume to appear as loud to us – we are more sensitive to it so it appears louder.
Mixing with EQ: A note on tonal balance.
Balancing EQs is difficult and you’ll need to listen carefully to your whole mix every time you make a change. You can’t just cut tons and tons of low-end from everything to free up head-room as your high-end will begin to sound thin and cluttered. Avoiding mixing mistakes, including EQ issues like this, is important. At the same time, cutting too much high-end from kicks and pads will dull your mix down and remove some of its presence. It’s between these interlinking factors that mix engineers find themselves spending a long time listening to a mix. The overlap between different instruments and their complex frequency ranges is tremendous! EQ is a heavily researched area of music production, there are hugely complex guides to it like this one on SoundonSound, if you want to delve into some serious audio physics.
Start slowly and carefully
For example, if you add too many frequencies around the 2 kHz area to push some brightness into percussion, things will begin to sound thinner, tinnier and harsher. You then go to compensate by adding some 100Hz to warm things back up and you then find that your mid frequencies are disappearing between the two boosts. Finally, you boost around 500Hz and then things just sound similar to how they started but a bit imbalanced and un-natural. This is when not knowing quite how to use EQ can become catastrophic. You cannot just add and add to compensate for problems or deficiencies and the same is true if you subtract. You cut above 10kHz to remove harshness and your sound becomes too bassy so you cut below 200Hz and it sounds too mid-high so then what’d you do? You’re stuck!
If you do get in a situation that you’ve EQ’d tons of things and it all sounds a bit weird then just bypass or remove them all and start again following these tips and remember – removing frequencies slowly and carefully will usually yield the best results!
Featured image under Creative Commons Attribution by woderferret
À propos de l'auteur

Sam Jeans
Musicien, producteur et rédacteur de contenuSam Jeans est un musicien, un producteur et un ingénieur du son. Au cours de sa brève collaboration avec MasteringBOX, il a écrit plusieurs articles intéressants.
Laisse un commentaire
Connecte-toi pour commenter.