Bass has always been an incredibly important component in records from older to newer, it keeps the rhythm locked in with the drum beat and kick patterns and provides that anchor on which the rest of the tune can elaborate more freely. In the digital realms, the methods available for efficiently mixing bass have increased with the increase of more bass heavy tracks.
Producing bass has developed over the years and now we have access to extremely low sub bass which didn’t exist before. Speakers couldn’t effectively generate sounds that low. Anything below 60Hz is considered sub bass, which is mostly felt rather than heard from frequencies ranging from 20Hz to 40Hz. A bass guitar can achieve a pitch as low as 41Hz and the lowest piano note, the lowest A, is 27.5Hz so there’s a fair bit down there that can’t be achieved easily with acoustic instruments and so techniques have changed in mixing bass! At least the huge, pumping sub bass we hear these days is purely a modern phenomenon. If you’re wanting to explore the world of bass a little more check out choosing your first bass guitar.
Bass is so hard to mix properly because it has so much sonic energy when used in music – it’s chunky and loud but at the same time, because it’s so low, it appears rather quiet to us because of the way the human ear has evolved. Tight, punchy bass will make all the difference when you master it on MasteringBOX. So that’s the dilemma, how do you get punchy, large bass sounds which don’t take up too much headroom or use too much of your song’s energy without issues or distortion?
When mixing bass, check these 3 steps to help you get the best results.
Clear up space in the low frequencies
Once you start composing and arranging your tune, pay attention to elements of your track which have a lot of bass frequencies which lie under around 100Hz. It’s quite surprising how many software instrument patches have really bassy harmonics. Working out what needs low-frequency content and what doesn’t is important when you come to mix your bass. They’ll clash with your actual bass significantly. Samples are the same, there’s often hidden bass which doesn’t sound good and isn’t needed. Many of these sounds which contain hidden bass might be in stereo too, so you’ll have this layer of stereo bass hidden in your track and that can cause all sorts of problems. Get into the routine of cutting the bass using high-pass filters, don’t be worried about cutting too much bass as your finished mix will thank you for being surgical here (read: Audio Filter Types).
One thing you can try is putting an EQ on your master and low-passing it around 150Hz. What you would ideally like to hear is a quite a clear, clean bass sound which isn’t muddied by other sounds which don’t need low-frequency information. Find those rogue bass tracks and cut them!
Make your bass mono
There is some leeway but when you come to mix bass, your lowest bass ought to be mono. This is because bass is hard for our ears to position – think of a sharp, crisp hand-clap – you can instantly tell if it’s left or right of the stereo field but a big bass is far harder for us to position. Stereo bass or bass which is too wide is generally a bad idea, make it mono using an imaging tool or just create it using a mono instrument track. Some soft synths have a width control, or a stereo wheel, which you can turn all the way to mono. Many electronic producers mono everything below 100Hz or so using an imager like Ozone Imager on the master track, this means you have no rogue bass floating around in the stereo field.
Another issue is producing your mono bass with too much reverb which spread your mono source so it’s still relatively big and wide. Some of these techniques can fatten up your bass and give it more presence but it’s a quick way to ruin your track’s mono components if done improperly. Too much reverb or chorus on a bass will smudge other sounds in the mix and cause phase cancellation.
Sidechaining: Mixing bass alongside your kicks
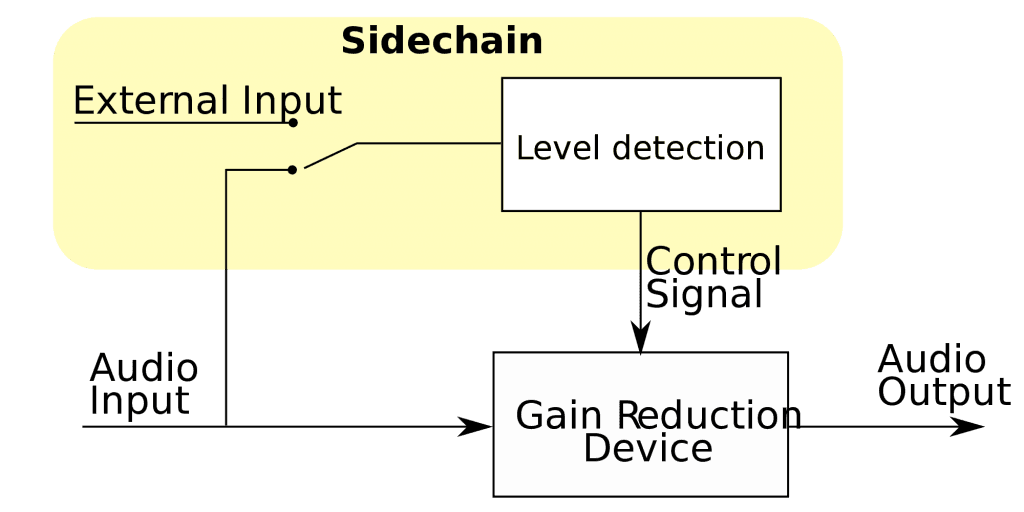
Sidechaining is vital in electronic music if you want to glue big kicks to big basses without phase and other issues. When you get to the stage of mixing bass in your track, make sure you have your side-chain compressor at the ready! When a big kick hits a big synth you get an enormous transient of bass energy and that can negatively affect your whole mix. Sidechaining, or ducking, is the answer, and it’s simply where your kick triggers a compressor on your bass track which ducks the bass signal, meaning the kick can punch through it effectively. This will help you in mixing bass alongside your kicks.
After the kick has punched through, the compressor releases which sucks your bassline back in. It’s useful and creates a great rhythmic pumping effect for your bassline. Sidechaining might take awhile to get right but it isn’t difficult – route a send into the key input on your chosen compressor first (this is an input which allows you to trigger a compressor with an external signal) and then tick the side-chain box. Set the attack to trigger the compressor quickly enough after the signal enters it and the release so it sucks the bassline back in after the inputted signal drops. A higher ratio will cause greater gain reduction and eventually, pumping.
À propos de l'auteur

Sam Jeans
Musicien, producteur et rédacteur de contenuSam Jeans est un musicien, un producteur et un ingénieur du son. Au cours de sa brève collaboration avec MasteringBOX, il a écrit plusieurs articles intéressants.
Laisse un commentaire
Connecte-toi pour commenter.