All microphones have one thing in common, they are used to record audio. However, the way in which they do this is the thing that sets them apart. In previous articles, we have discussed the main microphone types and how they capture sound differently. Today we’re going to investigate further and explore the five different microphone polar patterns and how to utilize them.
Why do we have different microphone polar patterns?
This answer is two-fold. Firstly, certain microphones exhibit particular polar patterns because of how they are designed. In order to achieve the desired sound, certain sacrifices must occasionally be made. However, more commonly, variation in microphone polar patterns exist to offer us more choice. They offer us more options in the same way that dynamic, condenser and ribbon microphones do. Mastering the understanding of microphone types as well as microphone polar patterns will give you a fantastic knowledge of when to use which microphone.
Cardioid
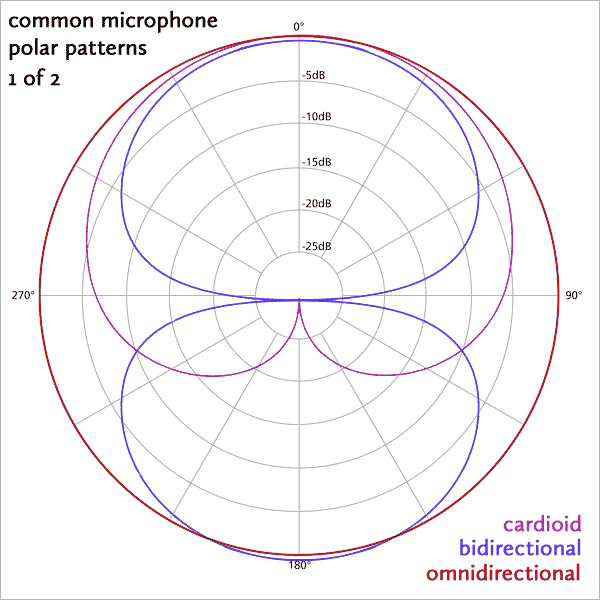
The most common of all microphone polar patterns, the cardioid pattern is found in both condensers and dynamic microphones. They tend to be the most sensitive from the front and the least sensitive from the rear. By this, I mean that they will pick up the most sound from directly in front of the microphone grille and the least from directly behind it. By offering great side rejection (blocking sounds perpendicular to the microphone), they can give fantastic isolation from unwanted ambient noise.
Most notable applications for a cardioid microphone would be recording vocals. Position your singer directly in front of the microphone. This will offer excellent clarity as they sing into the centre of the polar pattern. Also, due to the excellent rear rejection of cardioid microphones, you can utilise them whilst using loudspeaker monitors as opposed to headphones. Many singers report that they can offer a more powerful and emotional performance when not confined by headphones. Just make sure to place your speaker correctly so that it doesn’t pick up in your recordings.

Super-Cardioid & Hyper-Cardioid
Both Super and Hyper-Cardioid are similar to the aforementioned polar pattern. However, they both offer a tighter pickup and greater ambient rejection. For this reason, they are also the least susceptible to feedback of all polar patterns. Super-Cardioid offers a narrower field of capture whilst Hyper-Cardioid is even narrower still. However, this squeezing of the pickup focus results in slightly less rear rejection. As a result of this, you must consider placement thoroughly in order to minimise unwanted noise.
Let us take a small stage performance as an example. A Cardioid microphone positioned with its rear pointed directly at the audience will reduce ambient audience pickup to an all but inaudible level. However, a Super or Hyper-Cardioid is likely to pick up sound from the audience. That being said, they later two patterns tend to offer the least feedback and so have their place in a live scenario. The key is to experiment with what works best.
In the studio, Super & Hyper-Cardioid microphones lend themselves well as spot mics. As they have a tight and focused pickup pattern, they can be squeezed into small spots and do well even at high levels. This makes them very handy when recording drums. They also work fantastically in multi-tracking sessions. The high level of rejection they offer can yield clean recordings even with multiple instruments being played in the same space.
 Figure-8
Typically found in ribbon microphones, the figure-8 pattern offers pickup from the front and back of the mic and rejection at angles perpendicular to the front. They tend to be more susceptible to ambience than Cardioids so placement is important. However, their typical applications mean that this isn’t normally a huge issue.
Figure-8s have plenty of uses but a few ones to consider are as follows. Layering up vocals with duets can be made simple by using both sides of the microphone at once. They can also be placed between tom-tom drums on larger drum kits to pair the drums and save on channels. Another interesting use that is unique to this microphone is mid-side. By placing a figure-8 mic side-on to your source and pairing it with a Cardioid microphone, a very wide stereo field can be created from a singular position. For more detail, check out this article from Universal Audio on the mid-side technique.
Omnidirectional
As you may have guessed, omnidirectional microphones have an equal level of sensitivity from any direction. This makes them brilliant as ambient microphones as they do not need to be focused on a specific source. Most lavalier microphones are also omnidirectional so that if the wearer moves around, the microphone will still pick up their voice. However, unlike our previous microphone polar patterns, Omni microphones do not offer any level of rejection. This means that you must pay very careful attention to controlling unwanted noise when recording with them. Use screens to create barriers between unwanted noise sources and minimise issues.
As mentioned, Omnidirectional microphones make fantastic ambient room microphones. They are also very useful when recording choirs or groups of vocalists. You can place the microphone at mouth height and have multiple singers stand around the microphone in a circle. This will offer you a very rich, full vocal sound which is great for backing up lead lines. Next time you’ve got a band in and you’re looking for some character from the vocals, try having the whole band stand around one Omni mic. Even if they can’t sing all that well, the act of singing together offers more energy as they play off of each other’s performance. This can sound great when dialled in under a lead line and really help the vocals to stand out.
One last consideration for Figure-8 and Omnidirectional microphones
These days, there are many multi-pattern microphones on the market. Something like the AKG C414 can offer you pretty much every polar pattern. However, multi-pattern microphones never offer TRUE omnidirectional capabilities. Test this by walking around the mic whilst making noise. When you listen back to the recording, you should find at certain points the level of the signal drops. This displays slight rejection points in the design. The same goes for figure-8 patterns. An unbalanced figure-8 used for mid-side recording simply won’t work. If you can, always look for true, single pattern microphones. You’ll almost always find they do a better job.
TL;DR
Microphone polar patterns are just as important as microphone types. Master an understanding of both and you’ll be well set in the studio or on the stage. Correct usage of microphones can lead to rough mixes that sound fantastic even when untouched. Make use of the different techniques that these microphones offer and go create some fantastic recordings!
For some really great visual representations of what you’ve just read, check out Shure’s website. Hopefully, this visual cue will help alongside our article.
Post Image «Common Microphone Polar Patterns 1» under Creative Commons Attribution License by Robin Parmar.
Sobre el autor

Tim Dunphy
Ingeniero de sonido y redactor de contenidos especializadosMás de 10 años de experiencia trabajando en el sector del audio. De todo, desde enrollar XLR hasta masterizar álbumes. Soy un hombre hecho a sí mismo y mantengo mis activos en Bitcoin. ¿Qué más hay que saber?
Deja un comentario
Entrar para comentar