


Vocal Harmonies are basically the extra vocal lines that support a lead without simply cloning it. For beginners, the big win is simple: start with chord tones, favor smooth interval movement, and make sure the parts are in tune, in time, and intentionally arranged. For more advanced producers, the quality jump usually comes from better voice leading, smarter voicing, tighter timing alignment, controlled pitch correction, shared bus processing, and automation that keeps the lead in front while the stack expands and contracts with the song.
In practical production terms, Harmonies on Vocals usually work best when you separate the job into three layers: arrangement, editing, and mixing. Arrangement decides which notes to sing. Editing decides how tightly they land. Mixing decides how wide, polished, and backgrounded they feel. A polished result comes less from one “magic plugin” and more from good note choices, aligned phrasing, controlled tuning, shared bus treatment, and tempo-aware ambience.
If you want the fastest path to better results, use this beginner-to-pro ladder: sing a clean lead, write one harmony a third above or below, add a real double only where impact is needed, align consonants and note lengths, tune lightly, route the stack to a bus, carve low mids, control sibilance, use shorter ambience in verses and wider, brighter stacks in choruses, then automate levels and width over time. In my experience, that workflow solves the biggest harmony problems in the right order instead of trying to repair a weak arrangement with increasingly complicated processing.
Table of Contents
- Vocal Harmonies basics every singer and producer should know
- Arranging Harmonies on Vocals with better intervals and voicing
- Recording Vocal Harmonies with timing tuning and groove
- Mixing Harmonies on Vocals with a practical processing chain
- Genre-specific Vocal Harmonies and DAW workflow tips
- Common Vocal Harmonies mistakes and how to fix them
- Conclusion
Vocal Harmonies basics every singer and producer should know
When people talk about Vocal Harmonies, they’re talking about multiple pitches sounding together in a way that supports the melody. In Western tonal practice, the intervals you’ll reach for most often are unisons, octaves, fifths, and the third/sixth family, because those are the stable, musical colors that tend to blend well in real songs. The distinction between consonant and dissonant intervals is explained clearly in Open Music Theory’s interval guide, although the most useful interval will always depend on the chord, melody, style, and emotional effect you want.
Harmony theory basics for real-world vocal work
For a beginner, the easiest way to build Harmonies on Vocals is not to think “random pretty notes.” Think key, chord, melody. If the chord under the melody is C major and your lead is singing E, good harmony options are usually other chord tones like C or G. That is why so many easy harmony lines sound “obvious” once you hear them: they’re often just chord tones arranged with smooth movement.
When arranging more than one vocal part, you also need to consider the comfortable range of each singer, the density of the texture, and whether the harmony suits the style of the song. Those elements are central to Berklee’s contemporary vocal arranging course, which covers vocal ranges, harmony, texture, and multi-voice arrangements.
“Keep common tones … move remaining voices by step if possible.”
That Berklee rule is gold for vocal arranging. Translation: if one note can stay the same between two chords, let it stay. If another note needs to move, try a step before a leap. This is why a lot of lush stacks feel smooth instead of jumpy. The harmony doesn’t sound like separate people guessing; it sounds like one musical idea opening up.

Interval choices that usually sound good
If you only remember one cheat code, remember this: thirds and sixths are your safest harmony starters. They usually sound supportive, musical, and obviously “harmonic” without getting too hollow or too aggressive. Fifths and octaves feel more open and strong, which is great for lift, anthems, and gang-style arrangements. Seconds, sevenths, and tritones can be beautiful too, but they create more tension and need more deliberate writing.
A super practical beginner formula looks like this:
- Verse support: one soft third above or below
- Pre-chorus lift: add an octave double or a lower supporting part
- Chorus expansion: stack third + fifth or third + octave
- Big outro: doubles, wide pans, and occasional call-and-response layers
I usually recommend building the support gradually instead of throwing the whole choir at bar one. Selective widening, additional doubles, and denser voicings become much more effective when the listener has first heard a smaller arrangement.
Arranging Harmonies on Vocals with better intervals and voicing
Arrangement is where Vocal Harmonies either become emotional and expensive-sounding, or messy and amateur in about fifteen seconds. Before you touch tuning or EQ, decide what each extra part is doing. Is it supporting the lead? Answering it? Thickening the chorus? Extending the chord? That decision matters more than any plugin preset.
A quick visual break helps here, because real harmony sessions are usually less glamorous than people think: a lot of repetition, listening, aligning, and choosing blends that work.
Voicing, spread, and where parts should live
Voicing is the shape of the harmony stack. Close voicing means notes are packed near each other, which gives warmth and blend. More open voicing spreads notes farther apart, which can sound bigger and clearer.
In plain English, here’s the easy rule: if the section is busy, keep the harmony simpler and more intentional. If the section is spacious, you can afford bigger spreads, octave reinforcement, and wider stereo placement. When you need an immediate stereo structure, octave and fifth-based layers can provide a strong starting point, but they should still be adjusted around the singer’s range and the chord progression.
Doubling versus stacking
A double is the same part sung again. A stack is a collection of different vocal parts layered together. That distinction matters a lot. It’s important to differentiate vocal layering from multitrack harmonies: doubles add richness, width, and emphasis, while a true harmony changes the chordal color.

The best productions usually combine both approaches. Use doubles for thickness, confidence, and selected emphasis. Use stacks when you want obvious harmonic lift or a cinematic chorus. I would avoid doubling every line in the song just because you can. Saving the additional take for an important phrase, chorus, or downbeat gives it a purpose and makes the change more noticeable.
The table below is a practical shorthand that turns arranging principles into repeatable production moves. It combines traditional voice-leading ideas with practical decisions about doubles, width, and layered backgrounds.
| Technique | What it is | Best use | Beginner move | Advanced move |
|---|---|---|---|---|
| Lead double | Same melody, new take | Thickness, confidence | Tuck 6–12 dB under lead | Use only on key phrases or chorus downbeats |
| Third above | Diatonic supporting harmony | Pop, indie, worship | Sing one clean line above chorus | Alternate major/minor thirds based on chord |
| Third below | Lower support line | Folk, rock, R&B | Keep it soft and centered-ish | Let it move contrary to lead for smoother voice leading |
| Octave up | Same melody one octave higher | Lift, sparkle | Use on final chorus words | Blend with airy EQ and lighter compression |
| Octave down | Same melody an octave lower | Weight, authority | Great on sparse hooks | Filter lows and keep tighter in stereo |
| Full stack | Three or more distinct parts | Big choruses, outros | Start with lead + third + octave | Add fifths, contrary motion, sectional automation |
A simple arrangement template you can steal
Try this for a chorus in a major key:
- Lead: main melody
- Harmony one: third above on chord tones
- Harmony two: lower chord tone, often third below or root support
- Double: lead or top harmony, but only in key moments
- Octave layer: added only in final chorus
If your melody jumps a lot, don’t force every harmony to mirror the same leap. Let one line stay still or move by step. That gives you smoother voice leading and usually sounds more professional. The goal is not to eliminate all leaps, but to make every large movement sound intentional.
Recording Vocal Harmonies with timing tuning and groove
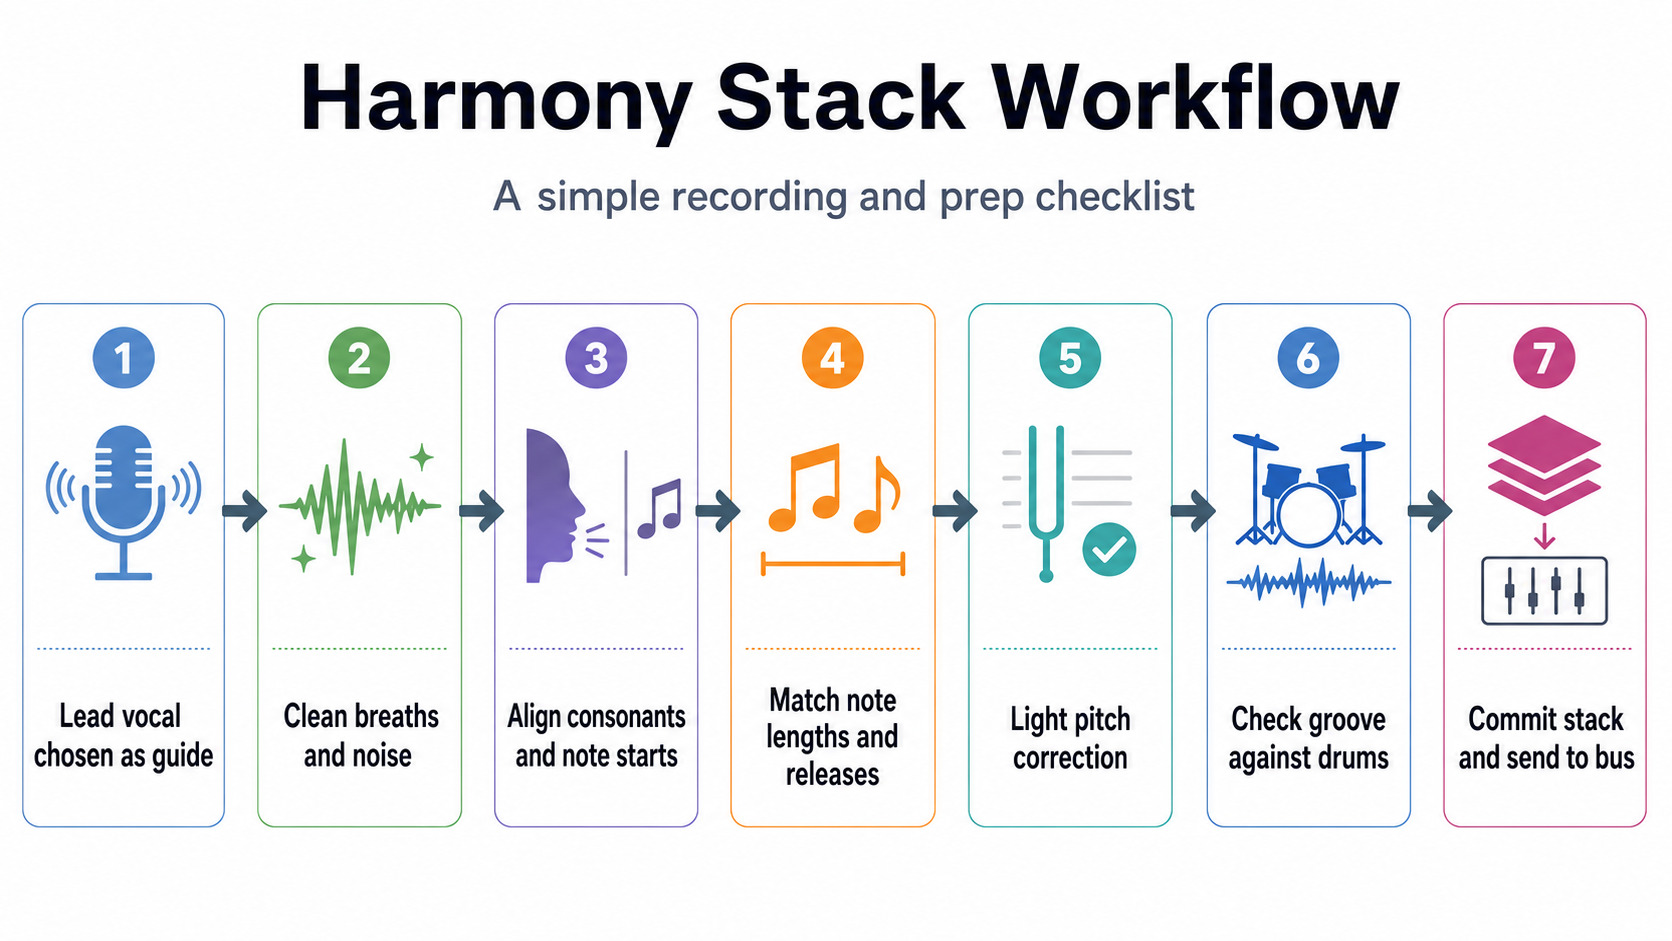
Once the arrangement is solid, the next battle is editing. Even beautiful note choices fall apart if consonants flam, vowels drift, or note endings don’t match. In my view, polished harmony stacks need editing before serious mixing begins, including breath cleanup, noise management, timing alignment, note tuning, and matched phrasing.
Getting the timing right without killing the feel
The first thing to align is consonants. If the “t,” “k,” “s,” or “ch” hits late on one layer, the stack sounds messy even if the note is technically correct. I normally align the main consonant, compare the vowel length, and then check the end of the note. Stray sibilance may need to be shortened or lowered separately because several singers producing an “s” at slightly different times can become surprisingly distracting.
When you edit manually, zoom in and line up starts, note endings, and strong consonants against the lead. For note-level work, tools such as Melodyne are useful for adjusting pitch, timing, duration, formants, and individual note transitions. Alignment tools such as VocAlign and Sync Vx can also speed up guide-to-double matching when a session contains a large number of layers.
For groove, don’t make every backing vocal sample-perfect unless the song wants that. Some styles benefit from a tiny bit of human spread. Tighten the timing enough to remove obvious flams, but keep enough variation for the performance to breathe.
Your DAW’s latency and track-delay behavior can also affect what you hear while editing. Ableton’s explanation of delay compensation shows how devices, routing, plugins, and track delays can introduce offsets that the software then attempts to compensate for. The wider production lesson is simple: small timing differences matter, but not all of them were necessarily created by the singer.
Tuning, pitch correction, and formants
I usually place pitch correction early in the chain, before heavy EQ, saturation, or compression. This gives the tuning stage a cleaner and more predictable signal to analyze. Transfer-based editors may also need to capture the vocal again if you substantially change the processing placed before them.
For natural tuning, my usual starting approach is:
- Start with little or no long-note stabilization
- Adjust the correction speed until short notes are controlled
- Listen carefully to held vowels
- Add humanization or flexibility only when longer notes become frozen
- Check transitions between notes, not only the center of each pitch
As broad starting ranges, 40–80 ms often gives a more transparent result, 10–20 ms creates a more noticeable modern sound, and 0–5 ms moves toward the classic hard-tuned effect. These numbers are not universal because different correction tools interpret their controls differently, but they are useful places to begin experimenting.
If you are shifting harmony parts by larger intervals, watch the formants. Large upward shifts can make a voice sound unnaturally small or cartoon-like, while strong downward shifts can produce an exaggeratedly deep character. Formant correction can preserve more of the original vocal identity, but perfect preservation is not always the goal. Sometimes a slightly altered formant helps an artificial layer sit behind the lead.
Mixing Harmonies on Vocals with a practical processing chain
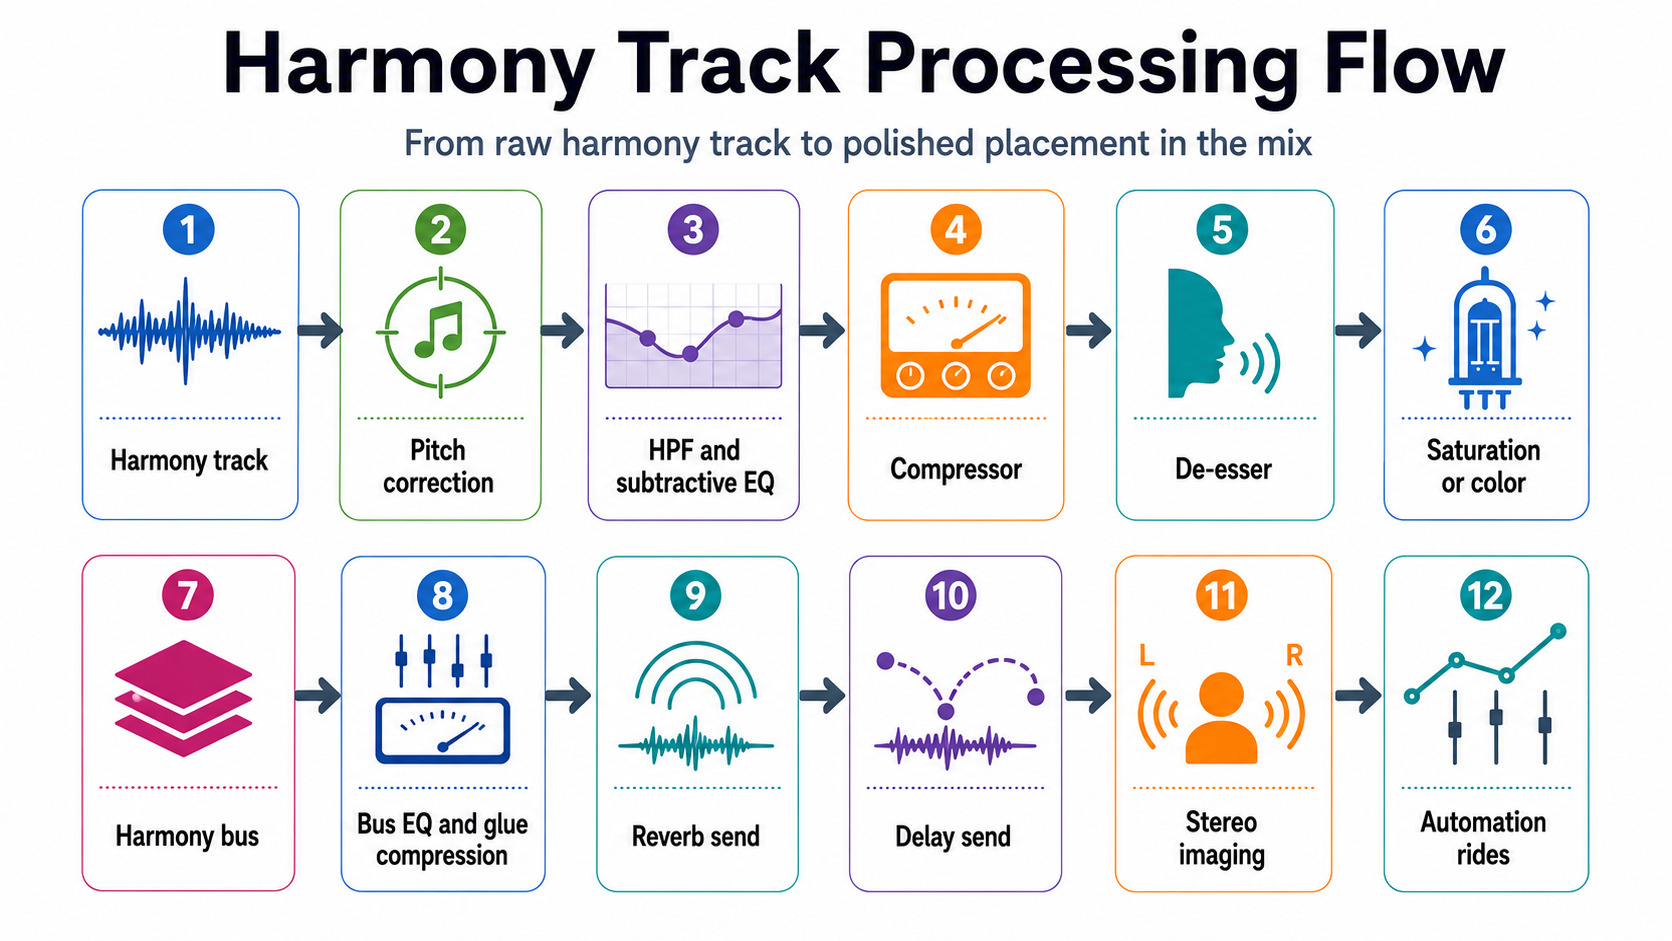
This is where people usually overcook things. My preference is to use fewer processors than you initially think you need, group related harmonies, and process with a clear purpose. Routing several background vocals to a shared bus lets compression, EQ, saturation, and ambience make them behave more like one instrument.
A reliable processing chain for Harmonies on Vocals
That order isn’t a law, but it follows a sensible signal flow: tune before heavy processing, control individual problems before the shared bus, and use group processing for the characteristics that should be common across the stack. I also prefer putting reverbs and delays on buses because one shared space generally sounds more coherent than several unrelated reverbs inserted independently.
Practical starting settings
These are not rigid rules. They are starting points based on how I typically approach pitch correction, de-essing, grouped background processing, delay synchronization, and bus-based ambience. Adjust by voice, arrangement, and genre.
| Processor | Starting point | Why it works on vocal harmonies |
|---|---|---|
| HPF / cleanup EQ | HPF around 90–140 Hz on most harmony parts; dip 200–400 Hz if cloudy | Clears rumble and low-mid pileup so stacks don’t get woolly |
| Presence / air EQ | Gentle boost around 3–5 kHz for clarity; shelf above 10 kHz if needed | Helps upper harmonies read without pushing level too hard |
| Compression | Ratio 2:1 to 4:1, medium attack, medium-fast release, 2–5 dB GR | Evens stack dynamics without crushing articulation |
| De-essing | Target harsh “s” area gently; 2–4 dB reduction as needed | Stops stacked sibilants from multiplying |
| Saturation | Very light drive, blended in with mix control | Adds harmonics and glue without obvious distortion |
| Reverb | Shorter plate/room in verse, longer or wider space in chorus | Pushes harmonies behind lead and expands choruses |
| Delay | Eighth-note or dotted-eighth-note on group as a starting point | Adds depth and rhythmic interest without washing out diction |
| Stereo width | Keep low parts narrower, let higher pads go wider | Preserves center focus while opening the stack |
For a clean pop stack, try HPF at 120 Hz, a small cut around 250 Hz, 3:1 compression, light de-essing, very subtle saturation, and a bright plate with modest pre-delay. If you want a wider chorus stack, keep the insert chain similar but push the reverb send, add a synced delay, and automate width outward. Finally, to get a hard-modern sound, move pitch correction faster, keep formants under control, and let ambience be shorter but more obvious in stereo.
Treat all those settings as hypotheses, not answers. Solo can help you locate a problem, but make final decisions while listening to the lead, instrumental, and harmony stack together.
Plugin categories that actually matter
The comparison below summarizes how I would categorize the main tool families in a practical harmony workflow.
| Tool | Best job | Practical strengths | When to reach for it |
|---|---|---|---|
| Antares Auto-Tune Pro | Fast pitch correction | Quick automatic tuning, manual control, formant and naturalness tools | Natural tuning or obvious hard-tune |
| Celemony Melodyne | Surgical note editing | Detailed pitch, timing, duration, formant, vibrato, and dynamics work | Detailed manual cleanup |
| Waves Harmony | Generated harmonies | Multi-voice generation with MIDI, graphic, spread, and formant control | Fast synthetic harmony creation |
| iZotope Nectar | All-in-one vocal shaping | Combined tuning, harmony generation, leveling, and vocal processing | Quick harmony production and mix startup |
| VocAlign / Sync Vx | Stack alignment | Guide-to-dub timing and pitch matching | Tight doubles and locked harmonies |
Panning, depth, and automation
Panning is where Harmonies on Vocals either become cinematic or distracting. Plan the position of each voice instead of moving tracks outward randomly. Asymmetrical panning can make a harmony more obvious and conversational, while symmetrical panning often helps layered pad-style vocals feel like a single background texture.
A great beginner layout is: lead center, main double near center, higher harmonies wider, lower support a little narrower. If you’re building a five-part texture, try a centered lead, wide outer layers, and intermediate harmonies halfway between the center and the edges. That’s not the only layout, but it’s a solid shortcut.
Automation seals the deal. Use it for volume rides, pan movement, send changes, and width changes between sections. Apple’s overview of automation in Logic Pro describes it as creating changes over time to volume, pan, effects, instruments, and other track settings. In practice, that means narrower, drier verses and bigger, brighter choruses rather than leaving the harmony stack static from start to finish.
Genre-specific Vocal Harmonies and DAW workflow tips
Different genres want different amounts of polish, pitch correction, density, and stereo drama. Vocal range, texture, arrangement density, and stylistic appropriateness should all change with the song. There is no single “correct” harmony sound.

Pop, R&B, rock, metal, and modern hard-tuned styles
Pop usually likes bright, controlled, polished stacks with clear thirds, doubles, and obvious chorus expansion.
R&B and atmospheric pop often benefit from softer edges, wider stereo support, more pad-like backgrounds, gentle tuning that adds coherence, and tasteful modulation or spread.
Rock tends to like narrower verse support and stronger chorus lift. Rock verses are often more restrained in width and level under the lead. Metal usually benefits from powerful, tightly edited support vocals with extremely deliberate rhythm. When the guitars and drums are already dense, loose consonants and uncontrolled lower harmonies can quickly blur the entire mix.
Hip-hop, trap, and electronic-adjacent vocals are where harder tuning becomes a texture, not just a fix. Pop and hip-hop often use heavy pitch correction as an audible effect. Faster correction, deliberate formant shaping, and repeated ad-lib stacks can become part of the identity of the production.
Workflow tips for Vocal Harmonies that work in any DAW
No matter what DAW you use, look for four things: bus routing, automation, timing offset control, and capture/edit integration. These are workflows, not brand loyalties.
Here’s a fast DAW-agnostic production flow:
- Record lead and choose the best comp
- Record one harmony at a time, not all at once
- Name parts clearly: Lead Dbl, High Third, Low Support, Oct Up
- Edit starts, ends, breaths, and sibilance
- Tune lightly, then align timing
- Route all backgrounds to a bus
- Build verse and chorus automation separately
- Print or freeze synthetic harmonies once the arrangement is approved
That sequence keeps the decisions organized: edit first, stack intentionally, process related parts together, and automate the emotional arc.
Common Vocal Harmonies mistakes and how to fix them
The most common mistake with Vocal Harmonies is trying to mix your way out of bad arrangement. If the notes fight the chord, no amount of de-essing is going to save it. Start by muting the effects and checking whether the harmony still makes musical sense as a dry piano-style idea.
Too much movement
The second common mistake is too much movement in every part. If every harmony line jumps around like the lead, the stack feels busy instead of rich. Keep some common tones, move some lines by step, and let one voice be the “glue” voice.
Tuning is not enough
Another mistake is thinking tuning alone creates polish. It doesn’t. Editing also includes breaths, noise, phrasing, consonants, vowel lengths, and note endings. If a stack is in tune but the syllables are landing at different times, it still sounds sloppy.
Ignoring formants
Ignoring formants on generated or shifted harmonies can cause serious issues. Upward shifts without suitable formant handling are one of the fastest ways to get fake-sounding vocals. Always compare the corrected and uncorrected versions in the context of the full mix rather than assuming that maximum formant preservation will automatically sound best.
Overprocessing
Finally, the last common mistake is overprocessing every single background vocal separately. Group processing exists for a reason. Routing related background vocals to a bus helps them behave like one instrument and keeps your CPU usage and decision-making under control.
If you want a simple troubleshooting cheat sheet, use this:
| Problem | Likely cause | Fast fix |
|---|---|---|
| Stack sounds muddy | Too many low mids, crowded low harmony voicing | HPF higher, cut 200–400 Hz, simplify lower parts |
| Stack sounds fake | Over-tuning or poor formant handling | Slow retune a bit, raise Humanize, enable formant correction |
| Stack sounds messy | Consonants and note lengths not aligned | Edit starts, ends, and sibilants before mixing |
| Chorus still feels small | No octave lift or level/width automation | Add octave layer or automate wider chorus sends |
| Lead disappears | Harmonies too bright, loud, or center-heavy | Pull stack level back, narrow low parts, automate lead priority |
| Effects wash out diction | Too much reverb, wrong delay timing | Shorten decay, reduce send, try eighth-note delay instead |
Conclusion
The last thing to remember is that big harmony production is usually sectional, not static. Verses are often narrower and drier. Choruses get wider, brighter, and more layered. Bridges may strip back again. This expansion and contraction can become part of the arrangement itself, an idea also explored in Berklee’s article on spatial and immersive mixing techniques.
If you build your workflow around smart intervals, smooth voice leading, clean editing, restrained tuning, bus glue, and section-by-section automation, your Vocal Harmonies will sound intentional instead of accidental. And that, more than any individual plugin, is what makes Harmonies on Vocals feel expensive.
O autorovi

Dídac
CEO & Zakladatel MasteringBOXDídac je profesionální zvukový inženýr, hudební producent a softwarový vývojář. Založil MasteringBOX a je autorem mnoha článků na našem blogu.
Přidat komentář
Přihlas se a pak můžeš komentovat


 English
 Español
 Français
 Italiano
 Deutsch
 Português
 Nederlands
 Svenska
 Polski
 Čeština